Copyright © Rogue Amoeba Software, Inc. All rights reserved.
Many audio output devices fail to provide proper volume adjustment when working with a Mac. Displays connected via HDMI or DisplayPort, as well as many other non-standard digital devices, simply offer no output controls. As a result, MacOS will not let you adjust the volume level for these devices, and the volume keys on your keyboard will have no effect.
SoundSource is able to work behind the scenes to provide volume adjustments for all audio devices connected to your Mac. Further, the Super Volume Keys feature makes it possible to control the volume levels for any audio output, even those that don’t allow it by default.
When SoundSource is running, it can adjust the volume of any output device. The volume slider adjusts the levels heard through the selected output device.
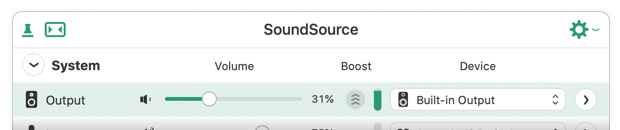
Even devices that normally don’t offer volume controls can be adjusted from SoundSource’s main window. Set the device as your system output, then use the volume slider in SoundSource to adjust the device’s volume.
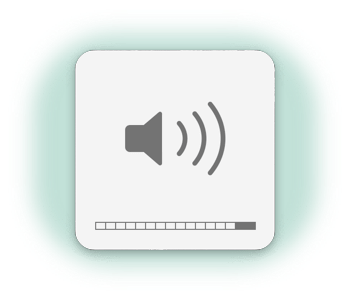
Audio devices without volume controls show a warning when using the keyboard keys. This overlay indicates the volume level won’t change:

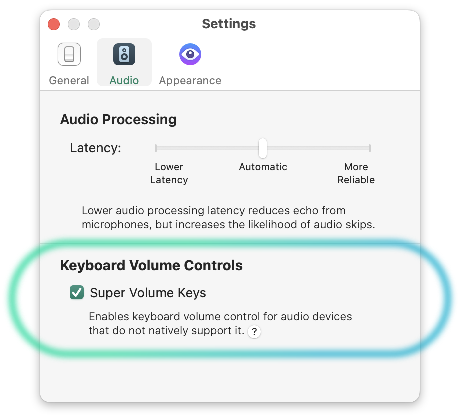
SoundSource’s Super Volume Keys feature can remove this limitation. Enabling Super Volume Keys in SoundSource’s Settings window extends its volume-change capabilities to your keyboard.
To turn on Super Volume Keys, open SoundSource’s Settings window. In the General tab, enable the Super Volume Keys checkbox. Your keyboard volume keys will then be able to adjust any audio device you set as the System Output.
In rare cases, some audio devices report volume controls to MacOS but won’t respond to adjustments. This unusual audio hardware keeps SoundSource from functioning as you desire. Even Super Volume Keys won’t help on its own.
An option to Force software volume control gives SoundSource special software-based volume controls. Make sure to select the appropriate device, in the Hidden Preferences of SoundSource’s Debugging window, and you’ll be set.

To access that setting, we’ll re-launch SoundSource. Start by clicking on the Options (Gear) menu in SoundSource’s main window, and navigate to the Help menu. Holding down the Option key on your keyboard replaces the Contact Us command with Quit and Relaunch for Debugging.
Selecting that will quit SoundSource, and relaunch it to its Debugging window. In the Hidden Preferences section, the Force software volume control option uses a pop-up button in the Value column. Click that to reveal a list of all output devices. Only select the device which needs forced software volume controls, otherwise you may end up with unexpected results.
Once that’s set, click the Done button to finish launching SoundSource. It will run with that tweak enabled, so you can adjust volume as expected.
SoundSource provides an Excluded Applications list in its Settings window, which disables SoundSource's audio processing for included apps. Any app added to the Excluded Applications list will not receive volume adjustments that would otherwise be applied by Super Volume Keys. Instead, it will play through the assigned output device at the volume level set by the device itself, with no intervention from SoundSource.
This may result in unexpectedly mismatched audio levels. For example, if SoundSource is lowering Device A’s volume from 100% to 50%, you would expect the level of all audio played via Device A to be cut in half. If an application is included in the Excluded Applications list, however, its volume will remain at 100%.
For best results, the Excluded Applications list is recommended only for limited-time troubleshooting, rather than long-term use.
When SoundSource is running, it will provide full volume control for all your audio output devices. Enabling Super Volume Keys can expand its abilities to use your keyboard’s volume keys with any device. If you play audio through a hardware device that does not ordinarily provide volume control, SoundSource stands ready to assist.
If you need personal assistance or want to provide feedback, our friendly support team is available via email. Click below to get in touch:
Contact UsWe're amazingly responsive! We strive to reply in under 24 hours.