Welcome to SoundSource
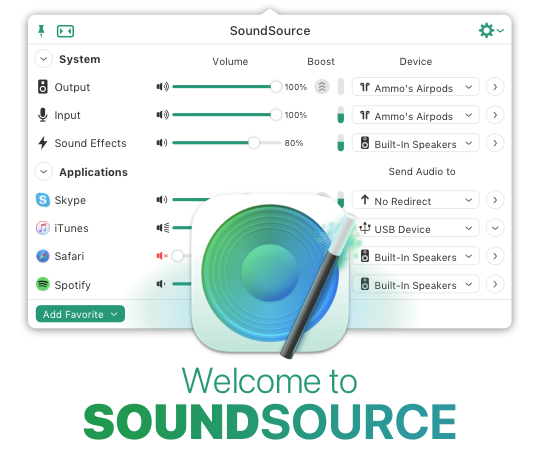
SoundSource gives you superior sound control on your Mac. Use it to control individual app settings, like volume and output device. Apply an equalizer and other audio effects to any audio. You also have fast access to your Mac's audio device settings and levels, from anywhere. SoundSource gives you truly powerful audio control, all from a globally available menu bar app.
Getting Started
This manual provides you with a useful overview of the application, including an outline of the interface, as well as details on using the application. We recommend a quick read-through, but you can also just dive in if you like. Refer back to this online manual for assistance at any time, right from SoundSource's Options (Gear) menu.
Additional Assistance
The following resources will supplement a read-through of the manual and help you get the answers you need.
Visit the SoundSource Support Center →
This manual is part of our searchable SoundSource Support Center, which also provides answers to common questions, as well as tutorials, tricks, and more.
Contact Support →
Rogue Amoeba's top-notch Support team is always ready to assist, both before and after purchase. Select Contact Support in the Help menu to get in touch. We're amazingly responsive, and strive to reply within 24 hours.
Information for Users of Previous Versions
If you've used SoundSource before, this information should prove helpful.
Release Notes →
The Release Notes window always provides a comprehensive list of improvements and fixes made to SoundSource. Access it from the in-app Help menu.
Upgrading to SoundSource 5 →
If you purchased a license for SoundSource 4, you're eligible for a heavily discounted upgrade to SoundSource 5.
See the What's New page to read about updates in version 5.
Accessing SoundSource
SoundSource is what’s known as a “menu bar application”. It lives entirely in the Mac’s menu bar. Unlike more traditional applications, SoundSource does not appear in your Dock, nor in the Command-Tab application switcher.
Menu Bar Access
To access SoundSource from anywhere, just click its icon. You can find it in the upper-right corner of your screen, near the clock:

SoundSource’s Menu Bar Icon
No matter what application you’re currently using, clicking SoundSource’s icon will reveal its main window.
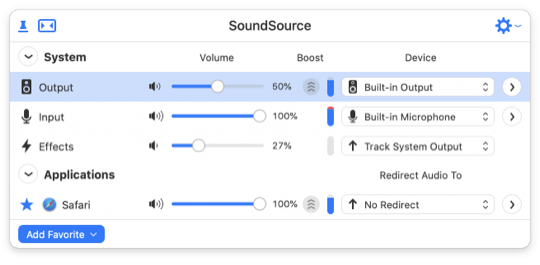
Standard View
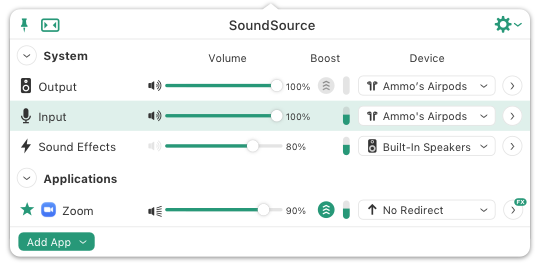
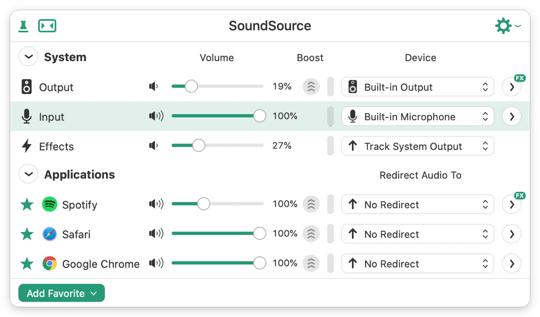
SoundSource’s Main Window
From here, you can access all parts of the application, adjusting audio settings as desired.
Compact View
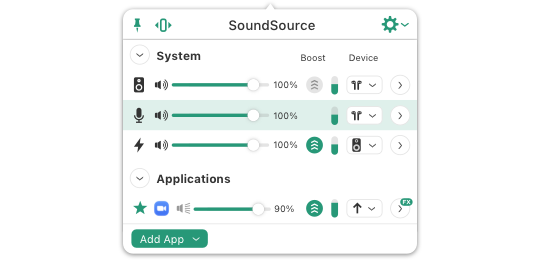
SoundSource’s Compact View
While SoundSource’s Standard view is streamlined by default, you can slim things down further with the Compact view seen above.

SoundSource’s View Toggle
To switch between Standard and Compact views, click the toggle button in the upper left.
For additional information on SoundSource and the menu bar, see the Menu Bar Controls page.
Floating Access
SoundSource’s main window can be pinned, as can its effects popovers. When a window is pinned, it will stay open, floating above other windows on your screen. To pin a window, click the Pin button:

SoundSource’s Pin Button
When you click the Pin button in the main window, SoundSource will detach from the menu bar, enabling you to drag it to your desired location on screen. You can also tear off and pin to an exact location, by clicking and dragging a window to wherever you’d like.
To close a pinned window, click the Pin button again to unpin it. It will return to its standard location for later access.
Keyboard Access
Finally, SoundSource can be accessed and controlled via the keyboard. When the configurable global keyboard shortcut is pressed, SoundSource’s main window will come forward and receive focus, enabling you to see your current settings, and adjust them.
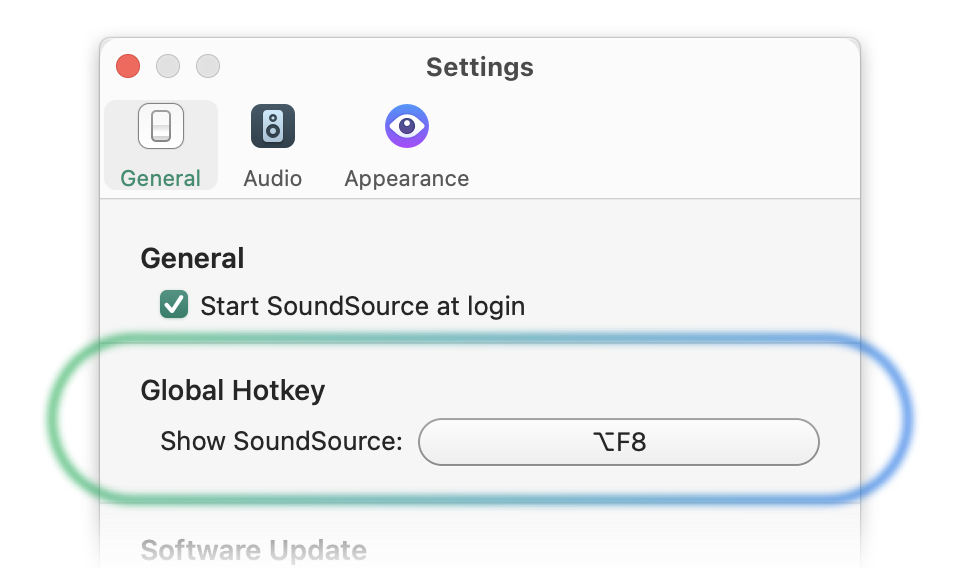
SoundSource’s Global Shortcut Setting
To set SoundSource’s global keyboard shortcut, open the Settings window and change the Show SoundSource option.
For a comprehensive overview on controlling SoundSource from the keyboard, be sure to read the Keyboard Controls page.
Available Controls
System Devices
At the top of SoundSource's main window, you'll find the controls for System audio devices. Here, you can adjust settings for the default devices the system uses for audio output, audio input, and sound effects.
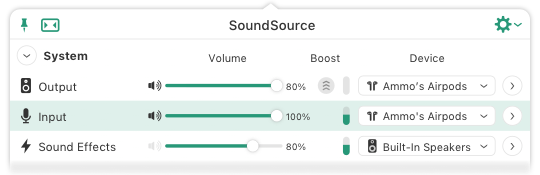
The System Devices Area
Output Device
By default, all audio on your Mac will play through the system's selected output device. Using these controls in SoundSource, you can switch the specific device being used for output, and adjust the output volume, balance, and sample rate.
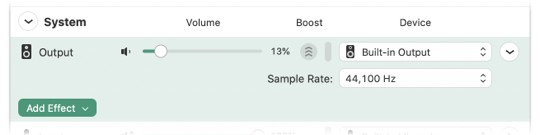
Output Device Controls
You can also apply audio effects to all audio played through the output device. For more details, see the Audio Effects page.
Input Device
The system's selected default input device is used to pull in audio in to your Mac, and will generally be something like a microphone or mixer. Using these controls in SoundSource, you can switch the specific device being used for input, and adjust the device's input level and sample rate.

Input Device Controls
Passive and Active Metering of the Default Input Device
By default, SoundSource's input meters now show activity only when the selected input device is actively being read by another application on the system. When the input meter is otherwise inactive, it will be drawn disabled to indicate that it's not displaying audio activity. We call this “passive metering”, and it’s used to prevent MacOS’s mic-in-use indicators from appearing at all times.
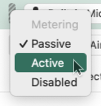
If you wish, you can restore SoundSource’s former “active metering” behavior to have the meter show input activity at all times. Control-click on the input device’s meter, then select “Active” from the pop-up menu. This setting will also affect the optional Default Input Device menu bar meters.
Be aware that active metering will cause MacOS’s mic-in-use indicator to appear whenever SoundSource’s main window is visible.
Sound Effects Device
Sound effects are a special type of audio played by applications on the Mac, and include things like the ding of a new email arriving or the bonk of an error occurring. You can opt to play sound effects through a secondary audio device, so they don't blast over other content you may be enjoying.

Sound Effects Device Controls
With these controls in SoundSource, you can switch the specific device being used for sound effects, and adjust its volume level.
Contextual Menu Control
Control-clicking a device in SoundSource's Devices list will reveal a contextual menu, containing additional options.
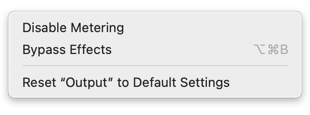
The Output contextual menu

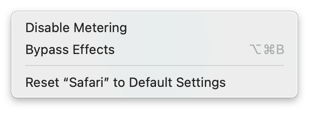
The Input and Sound Effects contextual menu
Disable Metering
With this option selected for a device, the corresponding level meter in SoundSource's main window will be disabled, and will not show audio activity. If the Output or Input menu bar meter setting is enabled in Settings, the corresponding meter will remain visible, but it will cease to show audio activity.
Bypass Effects
When this option is enabled, all effects processing for the output device will be disabled. For more details, see the Effects Overview page's Bypassing Effects section.
Reset “<Device Name>” to Default Settings
Adjustments made to an output device's audio settings within SoundSource are stored automatically, then applied whenever audio flows through that device. Selecting this reset option will fully reset a device, removing all adjustments SoundSource is applying to it.
After you reset a device, SoundSource will not adjust its audio in any way until you again instruct it to do so.
Per-App Adjustments
The lower half of SoundSource's main window provides audio control over applications. Here, SoundSource automatically lists any apps which are currently producing audio, or have done so in the last 15 seconds.
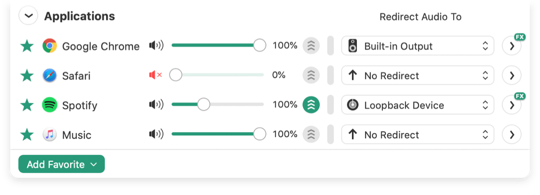
The Applications Area
Per-Application Audio Controls
Using the per-application controls, you can adjust the volume level of a specific app relative to others, or mute an application entirely. You can also control where audio plays, so different applications play audio through distinct outputs.
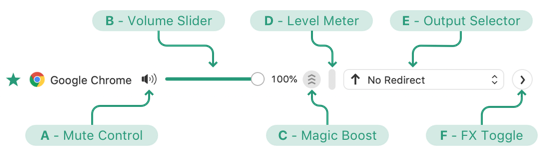
Basic Per-Application Controls
The basic controls for application adjustments are as follows:
(A) Mute Control: Click this to mute an application entirely. It also shows a general volume level, indicated by the number of waves coming out of the speaker
(B) Volume Slider: This slider allows you to adjust the level of audio played by the application.
(C) Magic Boost: Clicking this button turns on Magic Boost, discussed in more detail on the Built-In Effects page.
(D) Level Meter: This meter provides a visual representation of audio as it plays.
(E) Output Device Selector: With this menu, you can optionally redirect audio, changing the physical device through which the application's sound is played.
(F) Hide/Show Effects: This control toggles the visibility of the Effects area, and also shows an indicator when audio effects are being applied. See the Effects Overview page for more details.
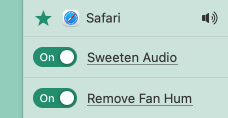
Per-Application Audio Effects
From an application's Effects area, you can apply audio effects.
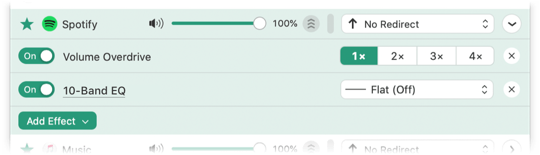
Per-Application Effects
Two built-in plugins, Volume Overdrive and the 10-Band Equalizer, are added to each application automatically. Their default settings make no change to the audio, but you can easily configure them to overdrive the volume or adjust output. With the Add Effect menu, you can add additional built-in effects, as well as third-party Audio Unit effects.
For more details on adjusting audio, see the Effects Overview page.
Favorite Applications
In addition to showing applications which are currently producing audio, or have recently done so, SoundSource's Applications list can be configured to show Favorites. Applications marked as Favorites will be kept at the top of the Applications list at all times.

In this image, Music is set as a Favorite
When you first run SoundSource, it automatically adds several common applications to its Favorites for easy configuration.
Adding Favorites
You can add applications to the Favorites area in one of two ways. For applications which are currently producing audio, you can click the star next to the application's name. This will also keep it in the Favorites area.

The “Favorites” Toggle
To add other applications from your Mac, use the Add Favorite menu.
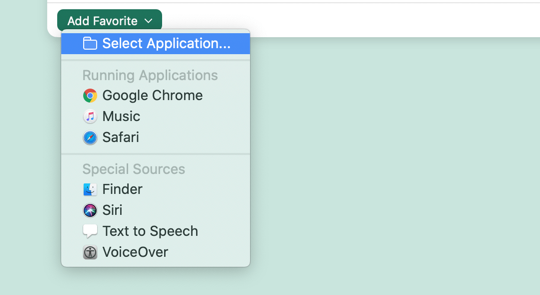
The “Add Favorites” Menu
Select the desired application, and it will be kept in the Favorites area.
Removing Favorites
It's also easy to remove an application from the Favorites area.

Click the Favorites toggle to remove an application
Click the star next to an application to remove it from the Favorites area. The application will then appear in SoundSource only when its producing audio.
Contextual Menu Control
Control-clicking an application in SoundSource's Applications list will reveal a contextual menu, containing several additional options.
Disable Metering
When this option selected for an application, the corresponding level meter in SoundSource's main window will be disabled, and will not show audio activity. If the Active Applications menu bar meter setting is enabled in Settings, the application's meter will remain visible, but it will cease to show audio activity.
Bypass Effects
When this option is enabled, all effects processing for the selected application will be disabled. For more details, see the Effects Overview page's Bypassing Effects section.
Reset “<Application Name>” to Default Settings
Adjustments made to an application's audio settings within SoundSource are stored automatically, then applied whenever that application produces audio. Selecting this option will fully reset an application and remove all adjustments SoundSource is applying.
After you reset an application, SoundSource will not adjust its audio in any way until you again instruct it to do so.
Audio Effects
Effects Overview
SoundSource makes it easy to apply audio effects to any audio playing on your Mac. SoundSource includes several built-in audio effects, and supports Audio Unit effects as well.
The following two pages provide information on those audio effects. On this page, you can get details on several facets of effects in SoundSource.
Audio Effects Indicator
To see which of your audio sources are being adjusted through the use of audio effects, look for the helpful FX indicator on the Hide/Show Effects button:

In the example screenshot below, audio effects are being applied to the System Output device, and to Spotify's audio, while audio from Safari and Chrome is not being adjusted.
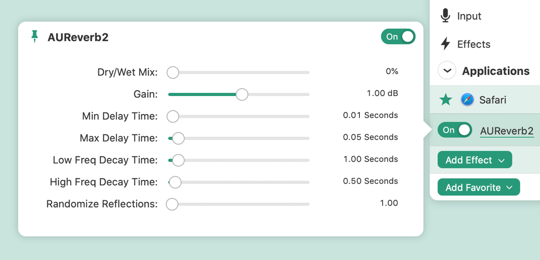
Effect Nicknames
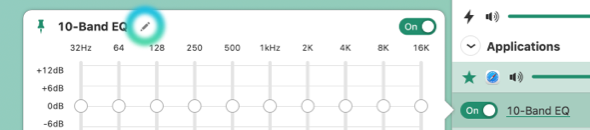
In each audio effect’s popover, you’ll see the effect’s default name. Next to that name is an Edit pencil. When you click this, you’ll be able to modify the name of the effect.
In the image above, two identical effects have each been given nicknames, to help distinguish them from one another. Effect nicknames are very useful for keeping track of what each effect is doing.
Presets

At the bottom of effects popovers in SoundSource, you'll see a section called Presets. Presets are a way to save settings for a particular effect, for later use. Presets are saved at the application level, which means they can be used in any instance of the effect in SoundSource.
A simple example of presets can be found in the 10-Band EQ. It comes with built-in presets for genres like “Rock” or “Jazz”, but you can also save custom presets. Tweak the settings to your liking, then select “Save as Preset” from the Presets menu. You'll be able to name your preset, and it will always be accessible from the Presets menu.

In addition to the 10-Band EQ, Audio Unit effects also support saving presets. Once you configure presets, they'll save you a tremendous amount of time.
Bypassing Effects
When the Bypass Effects option is enabled, effects processing will be disabled for the specified application or output device. This makes it possible to quickly toggle between an active or disabled effects configuration. Note that the On/Off state of each individual plugin will remain unchanged.
When Bypass Effects is turned on, a warning indicator will be shown to indicate that effects processing is disabled.
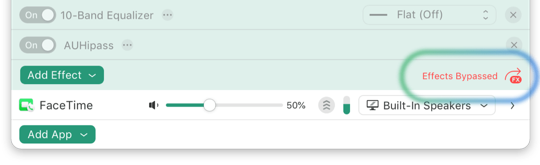
As indicated, effects on the Music app are being bypassed
To access the Bypass Effects setting, control-click the application or Output Device in the main window. The resulting contextual menu will include a Bypass Effects option which you can toggle on or off. In addition, when an application or the Output Device is selected in SoundSource, pressing Option-Command-B will toggle this option.
Advanced Notes on Audio Flow
Audiophiles may be curious about the exact pipeline through which audio flows when using SoundSource. Audio first flows through any per-app adjustments which are configured, and then through any System Output Device adjustments.
Within a single effects area, audio is adjusted by each plugin in sequence, moving from top to bottom. There is one exception, however: the Volume Overdrive effect. Regardless of the location of this effect, it is always applied last.
Built-In Effects
SoundSource includes several powerful audio effects to help you improve the sound of your audio. We've worked to make these built-in effects simple to use, so anyone can get great-sounding audio.
Magic Boost

When you activate Magic Boost, you'll get richer, fuller sound from any source. Magic Boost listens for quiet passages of audio, and gives them a healthy boost, while leaving louder audio untouched. Whatever your audio source, Magic Boost will give you tremendous volume, all with a single click. It's perfect for maxing out small speakers like those found on Mac laptops.
Volume Overdrive
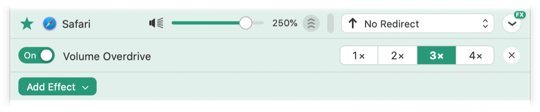
While Magic Boost will increase the level of quiet portions of audio, Volume Overdrive can assist in getting extra volume out of your speakers. It will amplify audio from individual applications up to 400%, making it possible to hear your audio even in loud environments.
Volume Overdrive improves the quality of overdriven audio, with limiting to prevent digital distortion. This works very well to amplify quiet audio, without blowing out sound that's already loud. This does mean that when you're listening to louder audio, you may not notice much boost when using Volume Overdrive.
Note that Volume Overdrive is not available on the system's default output. It must be applied to individual apps, within SoundSource's Applications section.
Comparing Magic Boost and Volume Overdrive

Magic Boost and Volume Overdrive can both increase the volume of audio, but they do so in different ways.
Magic Boost works to keep all audio at the same level, by raising the volume of quiet portions while leaving louder parts unaffected. This complex adjustment is often useful, but flattening the difference in levels can occasionally produce audio which sounds strange to the ear.
Volume Overdrive allows you to boost volume levels past 100%, maxing out the volume while maintaining the relative difference between quiet and loud portions. This is a simpler adjustment which attempts to get more out of your speakers for all audio.
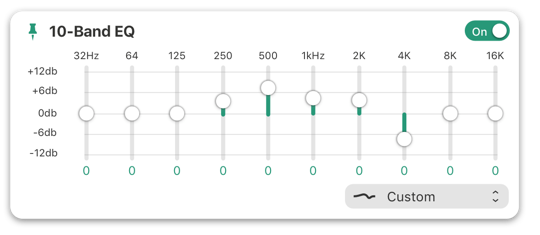
10-Band Lagutin Equalizer
For almost two decades, Rogue Amoeba's renowned 10-band Lagutin equalizer has helped users get better sound.

From the EQ's inline view, you can select from almost two dozen presets to adjustment any time you play audio.
For more control, click to reveal the full popover. From here, you can configure the EQ manually.
At the bottom of each Audio Unit, you'll see a section called Presets. After configuring an Audio Unit, you can save your custom settings for later use. For full details, see the Effects Overview page's Presets section.
Once you've configured it, you can even save your own custom equalizer settings. Adjust the equalizer to your liking, then select Save Preset As… from the Presets menu.
For full details on Presets, see the Effects Overview page's Presets section.
Balance
With Balance, you can adjust relative levels of audio playback between the left and right stereo channels.

Balance is available exclusively on the default output device.
Headphone Equalizer
Headphone EQ provides automatic calibrated equalization for headphones, powered by the well-known AutoEq project. Use it when playing audio to headphones to make them sound their very best.
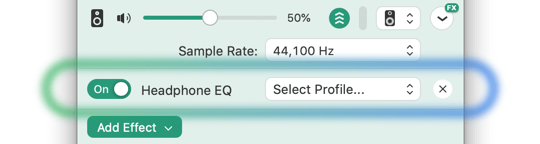
Headphone Equalizer is available exclusively on the default output device. Add the effect, then browse by name for the profile for your specific headphones.
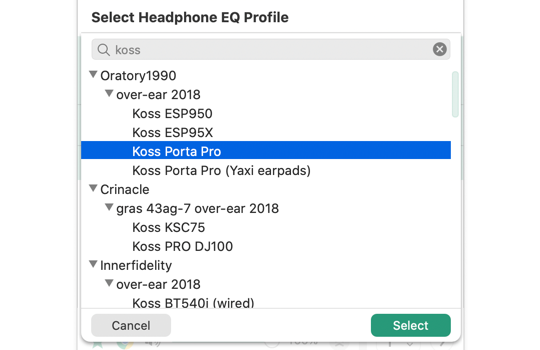
Profiles are available for thousands of different headphone models. Select the appropriate model to apply audio adjustment tuned precisely to get the best out of your exact headphones.
Using custom-created EQ Profiles
With SoundSource 5.3 and higher, it's possible to manually load custom EQ profiles into Headphone EQ. For full details, see this article.
Audio Unit Effects
SoundSource features support for Audio Unit effects, enabling you to adjust audio in countless ways to get the exact sound you want, from any application, or from your entire system.

SoundSource offers access to over a dozen Audio Units provided by Apple as part of MacOS. It also works with third-party Audio Units you've installed yourself.
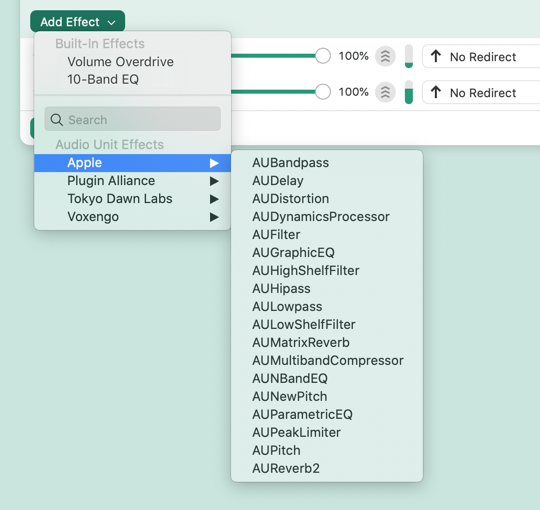
SoundSource will find Audio Units in two locations:
/Library/Audio/Plug-Ins/Components
~/Library/Audio/Plug-Ins/Components
When a compatible Audio Unit is installed in either of these locations, SoundSource will include it in the menu shown when clicking Add Effect for either the System Output device, or a per-application adjustment.
Saving Audio Unit Presets
At the bottom of each Audio Unit, you'll see a section called Presets. After configuring an Audio Unit, you can save your custom settings for later use. For full details, see the Effects Overview page's Presets section.
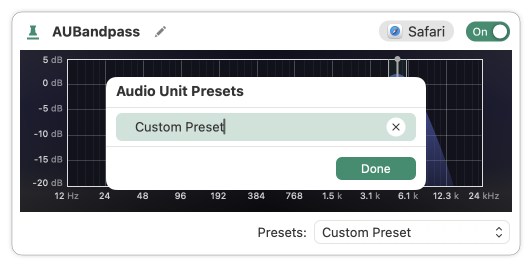
SoundSource saves standard Audio Unit presets. That means that in addition to being used throughout SoundSource, saved Audio Unit presets can be read by other applications which support Audio Units. Likewise, SoundSource will read presets created by any other applications.
Audio Unit Search
SoundSource sorts Audio Units by their developer, using sub-menus to make it easier to locate the desired effect. If you have a large number of Audio Units, however, the Audio Unit Search should prove helpful.
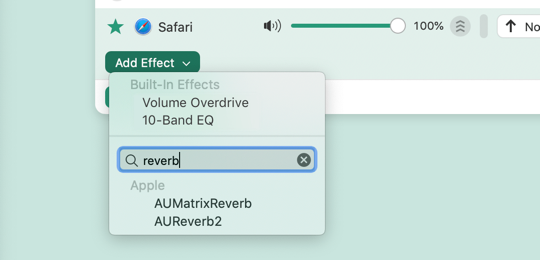
The search field is available within the Add Effect menu. Type a few characters of the name of your desired effect into this search field, and it should appear in the list for easy selection.
Generic Interfaces for Audio Unit Effects
Many Audio Unit effects have custom interfaces, which can occasionally cause issues or crashes. SoundSource can optionally use these effects with a generic interface instead, providing access to all controls. This can be helpful in avoiding issues, as well as making effects simpler to work with for VoiceOver users.
To toggle between the generic and custom interfaces, control-click on an effect and select Use Generic Audio Unit Interface or Use Custom Audio Unit Interface. To load the generic interface by default, hold the Shift key when adding the effect.
Menu Bar Controls
Unlike more traditional applications, SoundSource lives entirely in your system's menu bar. This page provides an overview of the various ways SoundSource interacts with the menu bar.
SoundSource's Main Icon
When you click SoundSource's icon in your menu bar, it will show the main SoundSource window.
SoundSource's Menu Bar Icon
Beyond providing access to SoundSource's window, this icon offers two additional functions.
Volume Indicator
SoundSource's menu bar icon shows a rough approximation of the current volume level for your default system output device. This is similar to the system's “Volume” menu bar icon, which SoundSource is intended to replace entirely.
Alternate Menu
While a standard click on SoundSource menu bar icons shows SoundSource's main window, Control-clicking reveals a convenient alternate menu instead.
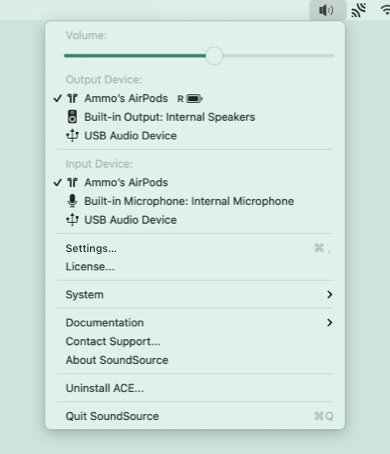
SoundSource's Alternate Control-Click Menu
This menu provides even faster access to the output volume slider and input and output adjustments, as well as many of SoundSource's settings and controls.
Details on Menu Bar Meters
In addition to its main icon, SoundSource can optionally provide meters in your menu bar, tied to specific audio sources. These meters can be turned on in the Appearance tab of the Settings window.
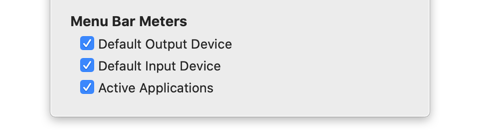
SoundSource's Menu Bar Meters Settings
For each of these settings that's turned on, SoundSource will place a small icon and meter pair in the menu bar.

An Assortment of Menu Bar Meters
The icon indicates the specific audio source, while the meter visually shows audio activity.
Muting
In addition to providing a visual indication for audio, these meters also offer a very handy mute control. Simply click an icon to mute audio from that source.
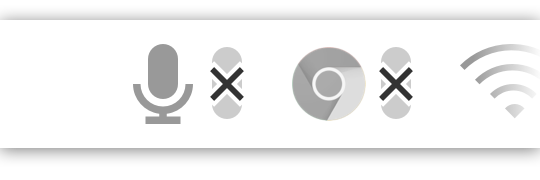
Input and Google Chrome, Muted
You can mute all output to the default device, or the output from individual active applications. Clicking the input icon will mute your microphone.
Understanding “Active Applications”
Turning on the Active Applications checkbox will cause menu bar meters to appear for all applications which are producing audio on your Mac. “Active applications” are specifically those which are currently producing audio, or have done so in the last 15 seconds. These same applications will also automatically appear in the Applications section of SoundSource's main window.
Passive and Active Metering With Input Menu Bar Meters
By default, SoundSource's input menu bar meters now show activity only when the system’s default input device is actively being read by another application on the system. When the input meter is otherwise inactive, it will be drawn disabled to indicate that it's not displaying audio activity. We call this “passive metering”, and it’s used to prevent MacOS’s mic-in-use indicators from appearing at all times.
Even when the meter itself is not showing activity, you can still click it to mute your input device instantly.
If you wish, you can restore SoundSource’s former “active metering” behavior to have the meter show input activity at all times. Control-click on the input device’s meter in SoundSource’s main window, then select “Active” from the pop-up menu. This setting will also affect the inline Input Device meters in the main window.
Be aware that active metering with the input menu bar meters will cause MacOS’s mic-in-use indicator to appear whenever SoundSource is open.
Re-Ordering Menu Bar Icons
All of SoundSource's menu bar icons can be moved around the menu bar as desired, to get the exact order you wish. To move any icon in the menu bar, press the Command key as you drag the icon left or right within the menu bar.
Keyboard Controls
To make lightning-fast adjustments to your audio, SoundSource can be controlled entirely from your keyboard. This page provides a comprehensive overview of the keyboard controls available in SoundSource.
Show SoundSource
With the Show SoundSource global hotkey, you can bring SoundSource forward from anywhere on your Mac. Doing so will place focus on the SoundSource window, enabling you to view the current settings and use additional keyboard controls to adjust them.

The global hotkey can be configured in the Settings.
General Navigation
When SoundSource's main window is in focus, several controls will work to navigate around the application's main window:
| Cycle through visible controls | Tab, Shift-Tab |
| Adjust selected control | Space bar |
| Move selected slider (Standard increment) | ←, → |
| Move selected slider (Large increment) | Shift-←, Shift-→ |
| De-select current item | Escape (Esc) |
| Select default output device | Cmd-0 |
| Select default input device | Cmd-Hyphen (-) |
| Select favorite application | Cmd-1 through Cmd-9 |
Item-Specific Navigation
When an individual item is selected in the top-level list, the following keyboard controls can also be used on it:
| Increase volume | Cmd-↑ |
| Decrease volume | Cmd-↓ |
| Mute/Unmute | Shift-Cmd-↓ |
| Open Effects area | → |
| Close Effects area | ← |
| Remove selected effect | Cmd-Delete |
| Jump to Effects list | Cmd-E |
| Bypass Effects | Opt-Cmd-B |
| Toggle selected effect on/off | Cmd-B |
| Move selected item up in list | Option-↑ |
| Move selected item down in list | Option-↓ |
Additional Keyboard Controls
Whenever SoundSource's main window is in focus, several additional shortcuts will also work.
| Open Settings | Cmd-, |
| Close Window | Cmd-W |
| Quit SoundSource | Cmd-Q |
Using Shortcuts with SoundSource
![]() On MacOS 12 (Monterey) and higher, SoundSource provides a slew of actions for use with the built-in Shortcuts app. These allow you to automate many different things, including changing device volumes, setting effect presets, toggling effects processing, and much more.
On MacOS 12 (Monterey) and higher, SoundSource provides a slew of actions for use with the built-in Shortcuts app. These allow you to automate many different things, including changing device volumes, setting effect presets, toggling effects processing, and much more.
Shortcuts Actions
With the Shortcuts actions included in SoundSource, it’s possible to integrate SoundSource into larger external workflows. This section provides a brief explanation for each of the included actions.
Get Active Applications: Returns a list of all applications that are currently producing audio, or have done so in the past 15 seconds
Get Device List: Returns a list of all available devices for the system's audio output or audio input
Get Source Device: Returns the device used by the chosen or supplied Source
Get Source Effects: Returns a list of all effects loaded for the chosen or supplied Source
Open/Close Effect Window: Opens or closes the window for the selected effect within the specified Source
Set All Effects Bypass: Sets the entire processing chain for the chosen or supplied Source(s) to “Active” or “Bypassed”, or toggles the chain’s state
Set Device Mute: Sets the hardware mute for the chosen or supplied device(s) to “Muted” or “Unmuted” if supported by the device(s), or toggles the mute state
Set Device Sample Rate: Sets the sample rate for the chosen or supplied audio device(s)
Set Device Volume: Sets the hardware volume on the chosen or supplied audio device(s), if supported by the device(s)
Set Effect Bypass: Sets the specified (via Magic Variable) audio effect to “Active” or “Bypassed”, or toggles the effect’s state
Set Effect Preset: Selects the selected preset for the chosen audio effect
Set Magic Boost: Sets the “Magic Boost” feature for the chosen or supplied Source(s) to “Enabled” or “Disabled”, or toggles the feature’s state
Set Metering: Sets the level meters animation for the chosen or supplied Source(s) to “Active” or “Bypassed”, or toggles animation’s state
Set Source Device: Sets the device for the chosen or supplied Source
Set Source Effect Bypass: Sets the chosen or supplied audio effect to “Active” or “Bypassed”, or toggles the effect’s state, for the chosen or supplied Source
Set Source Mute: Sets the specified Source(s) to “Muted” or “Unmuted”
Set Source Volume: Sets the volume level of the selected Source(s) to the specified value
Example Shortcuts
Using Shortcuts, you can chain multiple actions together to create powerful changes that take effect automatically. Below, we've provided some examples.
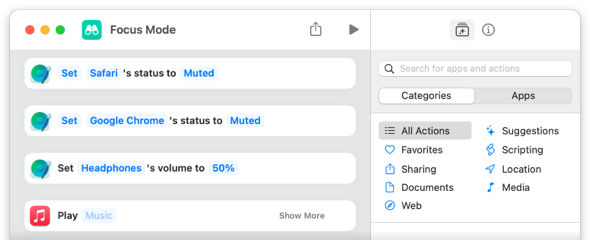
Focus Mode: Mute audio from select apps, then start a specific music playlist.
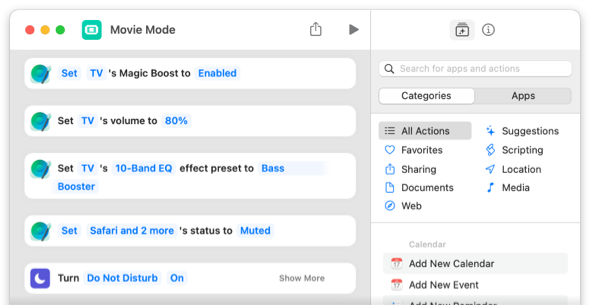
Movie Mode: Set audio playback of the TV app, mute other sources, and turn on 'do not disturb'.
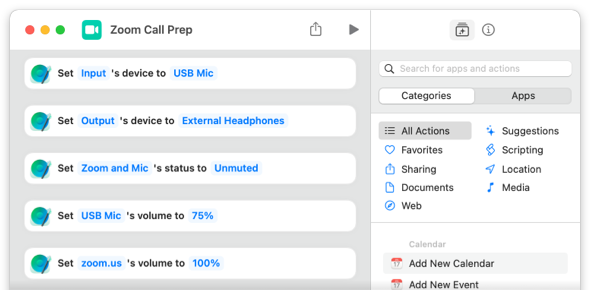
Call prep: set proper inputs and umute your mic.
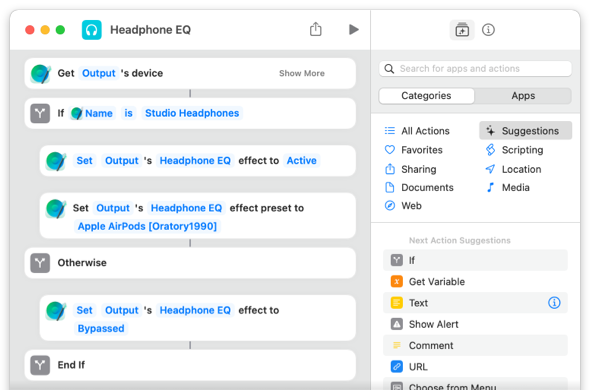
Headphone EQ: Set an EQ preset based on the specific output device.
Settings
SoundSource's settings can be accessed from the Options (Gear) menu in the upper-right corner of SoundSource's main window.
General Settings
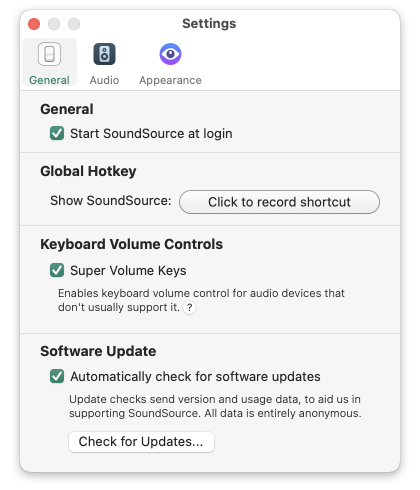
The General tab of SoundSource's Settings window
General
Start SoundSource at login: Turn this option on to have SoundSource run automatically when you login to your computer. SoundSource will then be able to provide uninterrupted audio adjustment and access to your sound controls. We strongly recommend turning this on!
Global Hotkey
Show SoundSource: Use this setting to configure a global keyboard shortcut which will immediately bring SoundSource to the foreground. This makes it easy to adjust settings, right from your keyboard.
Keyboard Volume Controls
Super Volume Keys: Activating this option will allow your keyboard volume keys to adjust any audio device you set as the System Output, even if the device does not support it on its own.
For more details, please see this article.

Software Update
Automatically check for software updates: With this option activated, SoundSource compares itself to the most current version available from our server and alerts you when a new version is available. Leave this on and SoundSource will help you stay up-to-date.
To initiate a check manually, click the Check for Updates… button.
Audio Settings

The Audio tab of SoundSource's Settings window
Audio Processing
Latency: This slider can be used to reduce latency while monitoring live audio. However, most users will not need to adjust it.
Setting this to Lower Latency can reduce or remove audio processing delay, which may be heard as a slight echo when monitoring live audio. However, this setting increases the chance of audio skips under high CPU load or on slower computers.
Excluded Applications
Excluded Applications List: When an app is added to this list, SoundSource will no longer have any impact on its audio. This completely avoids the addition of latency, but also prevents SoundSource from adjusting the application's volume control or applying audio effects to it.
Applications added to the Excluded Applications list will appear in a special Excluded section of SoundSource's main window when they actively play audio or if they’re set as favorites. SoundSource will still show activity in a level meter. This does not impact the audio in any way.
The Excluded Applications list is mainly intended to troubleshoot issues and incompatibilities , and most users should not need to use it.
As well, note that any applications added to the Excluded Applications list will no longer have their volume levels adjusted by device’s controlled via Super Volume Keys. For more details, please see this article.
Appearance Settings
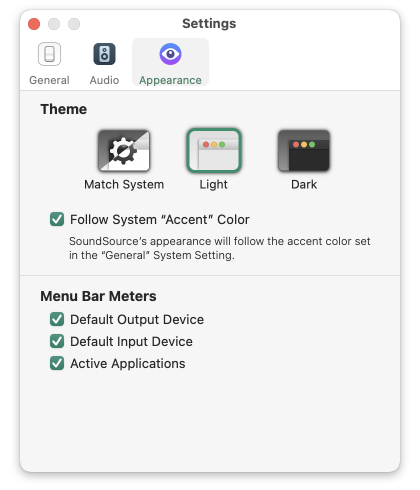
The Appearance tab of SoundSource's Settings window
Theme Selector: This setting dictates how SoundSource will appear, with a choice between a Light theme and a Dark theme.
The default Match System setting follows the OS-wide Appearance setting for Light or Dark Mode. You can alternately force SoundSource to use the Light or Dark theme, regardless of your system-wide settings.
This manual uses the Light theme for all screenshots, but you can easily try either theme. SoundSource's appearance will update immediately when you adjust this setting.
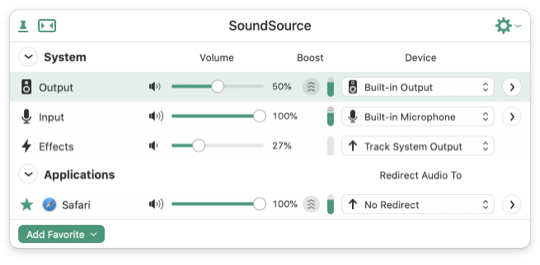
SoundSource's Light theme
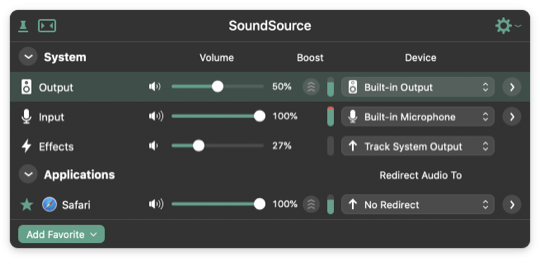
SoundSource's Dark theme
Follow System “Accent” Color: When turned on, SoundSource's appearance will change to follow the accent color you have configured in the “General” System Setting.
SoundSource's interface, following the system's Blue Accent color
Menu Bar Meters
A small icon and meter pair will appear in the menu bar for each of the checked items, to visually show audio activity.

SoundSource's menu bar meters in action, for the default output device, default input device, and an active application (Music)
Be sure to read the Menu Bar Controls page for additional information on these meters.
Permissions
SoundSource’s Permissions window can be accessed from the SoundSource menu. This window lists permissions which allow SoundSource to run optimally.
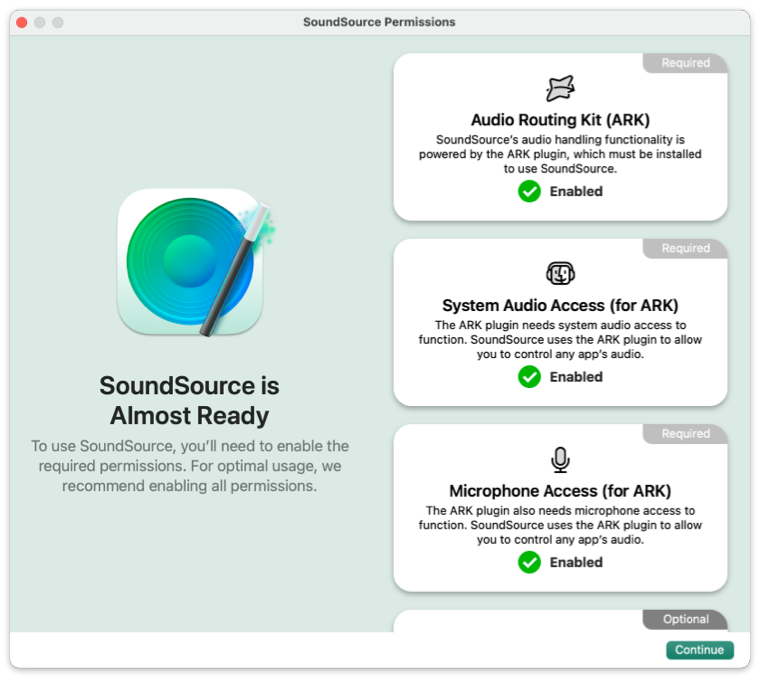
SoundSource’s Permissions window
Audio Routing Kit (ARK) [Required]
SoundSource uses the ARK plugin to route audio on your Mac according to your configuration. To use SoundSource, you must install ARK. This installation will require the administrator password for your Mac.
System Audio Access (for ARK) [Required]
Once installed, ARK needs system audio access to enable you to route audio on your Mac. This access is required for SoundSource to operate, and you’ll be prompted to grant permission the first time you launch the app.
Microphone Access (for ARK) [Required]
ARK also needs microphone access to enable you to route audio on your Mac. This access is required for SoundSource to operate, and you’ll be prompted to grant permission the first time you launch the app.
Accessibility Access [Optional]
In order for the Super Volume Keys feature to work, SoundSource must have Accessibility access.
When Accessibility access has not yet been granted, the Audio tab of SoundSource’s Settings window will show this notice:
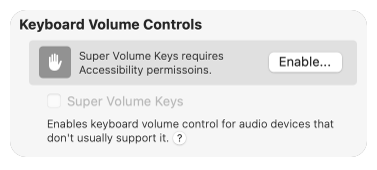
Click the Enable button to open the Permissions window, then click the Enable window in Accessibility Access section. You’ll see a brief explanatory dialog:
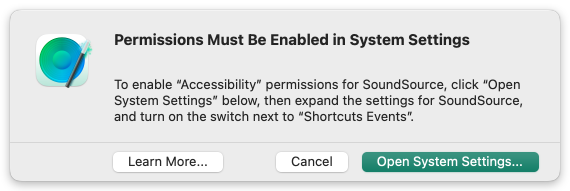
Follow these instructions to enable Accessibility access for SoundSource, after which Super Volume Keys will be activated.
For more information on Super Volume Keys, please see this article.
Bluetooth Access [Optional, MacOS 14+]
On MacOS 14 (Sonoma) and higher, you’ll need to enable Bluetooth access for SoundSource to provide the optimal experience with Bluetooth audio devices and your Mac. This includes the ability to connect to devices from within a device selector, as well as accessing features such as battery status.
When Bluetooth access has not yet been granted, SoundSource’s device selectors will show this note:
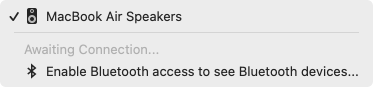
Select the Enable Bluetooth access to see Bluetooth devices… option, then click the Enable button in the Bluetooth Access section. You’ll then see this prompt:
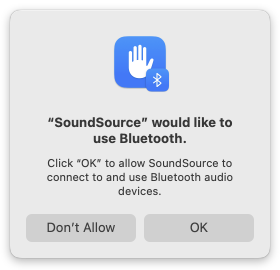
Click OK to enable Bluetooth access for SoundSource, and you’ll be all set.
Relaunching To Provide Bluetooth Access
If you’ve previously denied SoundSource permission to access Bluetooth, you’ll see the following dialog when you try to enable the permission.
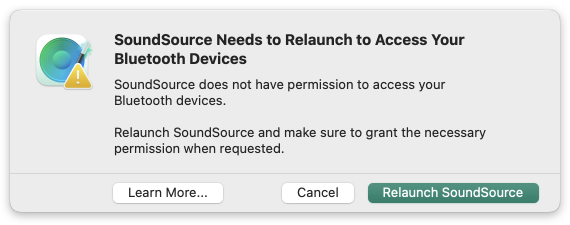
Click Relaunch SoundSource, then grant permission when the application relaunches.
Purchasing
Quick Link: Visit our online store to buy a license key for SoundSource.
Why should I buy SoundSource?
Put simply, you should buy SoundSource because it isn't free. We provide a free trial, so you can test out the program and all its features before you buy it. It's like test driving a car, for as long as it takes you to decide.
During the trial, all of SoundSource's features are available to try, but it won't work for full-time use. While in trial mode, the quality of audio adjusted by SoundSource will be degraded after 20 minutes per launch.
If you use SoundSource and find you like it, please purchase a license key - support the software you use and love!
To purchase your license key, just visit https://rogueamoeba.com/store/.
What about upgrades?
If you purchased a license for SoundSource 4 (your license key will start with TCAT-), you're eligible for a discounted upgrade to version 5.
Read about what's new in SoundSource 5 on our site, then purchase a discounted upgrade.
After Purchase
How do I unlock the full version?
The download of SoundSource from our site contains both a free trial of the software and the full version. To unlock the full, unlimited version, you just need a valid license key. When you purchase through our store, you'll immediately receive a license key in your browser as well as via email. Simply enter this key into SoundSource to unlock it.
What's your upgrade policy?
While we don't have a hard and fast upgrade policy, our philosophy regarding paid upgrades is simple: We try to do what's right for you and what's right for us. We've got a great track record, with many years of very satisfied customers.
For more details on free updates and paid upgrades, please see this page.
What's your refund policy?
All Rogue Amoeba products are available to try before you buy. We believe that no customer should have to buy software in order to find out how well it works. Our software can be fully evaluated with no limitations in capabilities, prior to purchase. Customers are strongly encouraged to take advantage of these trials prior to purchase. You may also seek any needed technical support from us - we answer support emails rapidly and responsively for current and potential customers alike.
If you would like a refund, please contact our Support Team within 14 days of your purchase. Because we cannot recover the license key that was sold, refunds are issued on a case-by-case basis.
Etcetera
Installing & Uninstalling
Installing SoundSource
To install SoundSource, drag it from your download folder to the Applications folder, then double-click its icon to begin using it. SoundSource will walk you through the process for installing the Audio Routing Kit (ARK) plugin and enabling the necessary permissions to control audio. This installation will require the administrator password for your Mac.
Uninstalling SoundSource
To remove SoundSource, click the Options (Gear) menu, then navigate to the Help sub-menu and select Uninstall SoundSource. SoundSource will then initiate a process to remove its backend components from the system, which may require your administrator password.
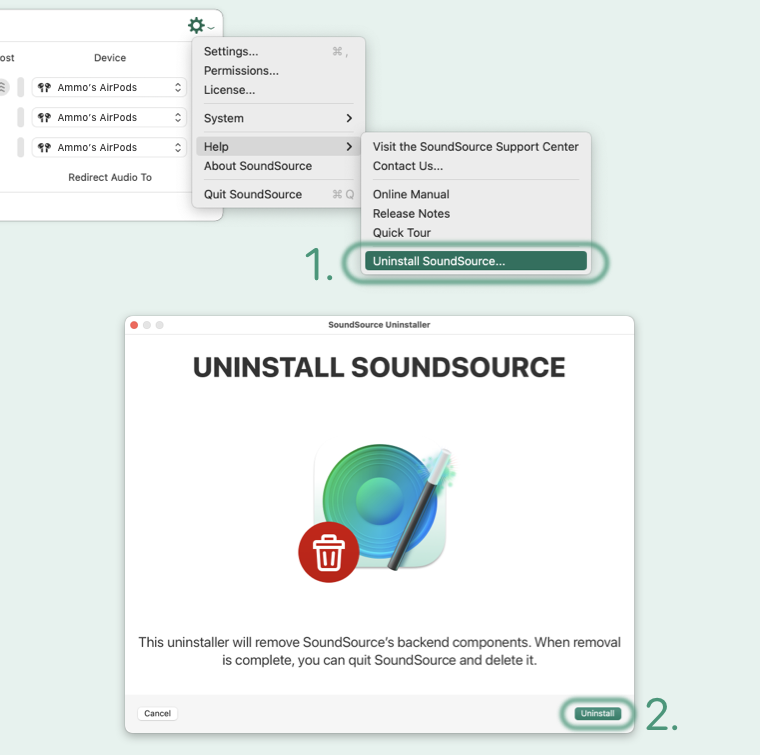
Once this uninstall process completes, you can quit SoundSource and drag the application to the Trash.
If you have any feedback to share, know that we’ll be glad to hear it. Contact us directly to make a feature request, report a problem, or to get assistance. We're always working to improve our products, so please don't hesitate to tell us what was missing or didn't work for you.
User License
Disclaimer
SoundSource (“The Software”) is provided as is. Rogue Amoeba Software (“The Author”) is not responsible for any damage to the user's computer system or data and in no event will The Author, its officers, directors, employees or agents be responsible to the user for any consequential, incidental, or indirect damages (including damages for loss of business profits, business interruption, loss of business information, and the like) arising out of the use or inability to use the The Software, even if The Author has been advised of the possibility of such damages. Because some locations do not allow the exclusion or limitation of liability for consequential or incidental damages, the above limitations may not apply to you. Further, the consumer agrees that using this software in any way illegal, or even for the purposes of assessing its viability for illegal usage, is prohibited.
What that said:
Be safe when you use the software. Be aware that it's simply a tool designed to make your life better. Don't use it to do illegal or evil things. If you do, be ready to take responsibility for your own actions.
Distribution
Unless explicitly stated in writing, Rogue Amoeba Software does not grant permission to sell The Software. Non-profit distribution of The Software in its trial form is generally acceptable, provided that The Software is not modified in any way, the complete works of The Software are included in the distribution package, and Rogue Amoeba has been contacted for confirmation.
What that said:
Don't sell this software. If you wish to distribute it in its trial state, get in touch with us to confirm permission.
Acknowledgements
Portions of this Rogue Amoeba software may utilize the following copyrighted material, the use of which is hereby acknowledged.
Sparkle
Copyright © Andy Matuschak
Permission is hereby granted, free of charge, to any person obtaining a copy of this software and associated documentation files (the "Software"), to deal in the Software without restriction, including without limitation the rights to use, copy, modify, merge, publish, distribute, sublicense, and/or sell copies of the Software, and to permit persons to whom the Software is furnished to do so, subject to the following conditions:
The above copyright notice and this permission notice shall be included in all copies or substantial portions of the Software.
THE SOFTWARE IS PROVIDED "AS IS", WITHOUT WARRANTY OF ANY KIND, EXPRESS OR IMPLIED, INCLUDING BUT NOT LIMITED TO THE WARRANTIES OF MERCHANTABILITY, FITNESS FOR A PARTICULAR PURPOSE AND NONINFRINGEMENT. IN NO EVENT SHALL THE AUTHORS OR COPYRIGHT HOLDERS BE LIABLE FOR ANY CLAIM, DAMAGES OR OTHER LIABILITY, WHETHER IN AN ACTION OF CONTRACT, TORT OR OTHERWISE, ARISING FROM, OUT OF OR IN CONNECTION WITH THE SOFTWARE OR THE USE OR OTHER DEALINGS IN THE SOFTWARE.
AutoEq
Copyright © Jaakko Pasanen
Permission is hereby granted, free of charge, to any person obtaining a copy of this software and associated documentation files (the "Software"), to deal in the Software without restriction, including without limitation the rights to use, copy, modify, merge, publish, distribute, sublicense, and/or sell copies of the Software, and to permit persons to whom the Software is furnished to do so, subject to the following conditions:
The above copyright notice and this permission notice shall be included in all copies or substantial portions of the Software.
THE SOFTWARE IS PROVIDED "AS IS", WITHOUT WARRANTY OF ANY KIND, EXPRESS OR IMPLIED, INCLUDING BUT NOT LIMITED TO THE WARRANTIES OF MERCHANTABILITY, FITNESS FOR A PARTICULAR PURPOSE AND NONINFRINGEMENT. IN NO EVENT SHALL THE AUTHORS OR COPYRIGHT HOLDERS BE LIABLE FOR ANY CLAIM, DAMAGES OR OTHER LIABILITY, WHETHER IN AN ACTION OF CONTRACT, TORT OR OTHERWISE, ARISING FROM, OUT OF OR IN CONNECTION WITH THE SOFTWARE OR THE USE OR OTHER DEALINGS IN THE SOFTWARE.
audioOSD
Copyright © Perceval FARAMAZ
Permission is hereby granted, free of charge, to any person obtaining a copy of this software and associated documentation files (the "Software"), to deal in the Software without restriction, including without limitation the rights to use, copy, modify, merge, publish, distribute, sublicense, and/or sell copies of the Software, and to permit persons to whom the Software is furnished to do so, subject to the following conditions:
The above copyright notice and this permission notice shall be included in all copies or substantial portions of the Software.
THE SOFTWARE IS PROVIDED "AS IS", WITHOUT WARRANTY OF ANY KIND, EXPRESS OR IMPLIED, INCLUDING BUT NOT LIMITED TO THE WARRANTIES OF MERCHANTABILITY, FITNESS FOR A PARTICULAR PURPOSE AND NONINFRINGEMENT. IN NO EVENT SHALL THE AUTHORS OR COPYRIGHT HOLDERS BE LIABLE FOR ANY CLAIM, DAMAGES OR OTHER LIABILITY, WHETHER IN AN ACTION OF CONTRACT, TORT OR OTHERWISE, ARISING FROM, OUT OF OR IN CONNECTION WITH THE SOFTWARE OR THE USE OR OTHER DEALINGS IN THE SOFTWARE.