Welcome to Audio Hijack
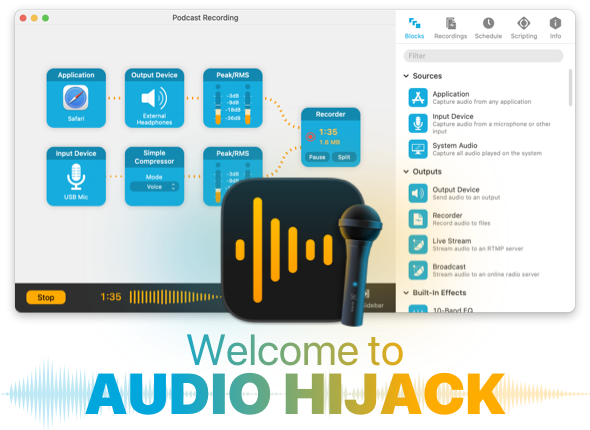
Audio Hijack is a powerful audio recorder, enabling you to record any audio heard on your Mac. Save web streams, create podcasts, preserve important voice chat conversations, and so much more. If you can hear it, Audio Hijack can record it.
But Audio Hijack's abilities extend beyond recording, to other audio tasks as well. It makes it easy for content creators to broadcast RTMP live streams or online radio stations. If you want to improve microphone inputs, or apply an equalizer to a movie, the powerful audio effects can help. You can even timeshift audio on your Mac, rewinding live audio.
Recording, broadcasting, effects, and more. That's Audio Hijack. We can't wait to hear how you use it.
Getting Started
This manual provides you with a helpful overview of Audio Hijack, including an outline of the interface, as well as details on using the application. We recommend a quick read-through, but you can also just jump right into the app if you like. Refer back to this online manual for assistance at any time, right from Audio Hijack's Help menu.
Additional Assistance
The following resources will supplement a read-through of the manual and help you get the answers you need.
Visit the Audio Hijack Support Center →
Rogue Amoeba's top-notch Support team is always ready to assist, both before and after purchase. Select Contact Support in the Help menu to get in touch. We're amazingly responsive, and strive to reply within 24 hours.
Contact Support →
Rogue Amoeba's top-notch Support team is always ready to assist, both before and after purchase. Select Contact Support in the Help menu to get in touch. We're amazingly responsive, and strive to reply within 24 hours.
Information for Users of Previous Versions
If you've used Audio Hijack before, this information should prove helpful.
Release Notes →
The Release Notes window always provides a comprehensive list of improvements and fixes made to Audio Hijack. Access it from the in-app Help menu.
Upgrading to Audio Hijack 4 →
If you previously purchased a license for Audio Hijack 3, you're eligible for a heavily discounted upgrade to Audio Hijack 4.
To read about major updates in version 4, see the “What's New” page on our site.
Starting Simple
Though Audio Hijack is quite powerful, it's also very easy to pick up. To get you started, this page provides a look at an example session window, then gives a simple walk-through of how to use Audio Hijack. Later manual pages will provide more depth on everything you see here.
Interface Overview
Below, an example Audio Hijack session is shown, with its most important controls annotated.
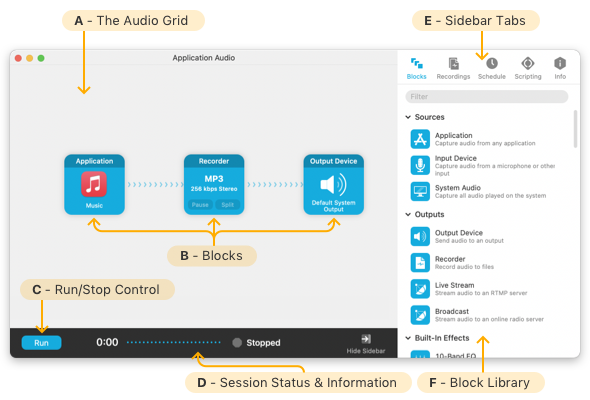
(A) Audio Grid: The audio grid contains a pipeline of blocks chained together to manipulate audio.
(B) Blocks: Individual blocks capture, adjust, record, and play back audio within a session. Here the pipeline consists of an Application block, a Recorder block, and an Output Device block.
(C) Run/Stop Control: Once a session is configured, click the Run button to begin capturing audio. Click Stop to toggle the session back off.
(D) Session Status & Information : This section provides details on the session, updating dynamically when the session is active.
(E) Sidebar Tabs: The session sidebar contains a wealth of controls for a session. The tabs seen here are covered in-depth on Sidebar Controls page.
(F) Block Library: The block library contains all available blocks, to be added to your pipeline in the audio grid.
An Introductory Example
Audio Hijack is most frequently used to record audio from another application running on your Mac. In this example, we'll set Audio Hijack up to record web-based audio from the Safari web browser.
Creating a Session
First, we'll click New Session in the Session List window. This brings up the Template Chooser.
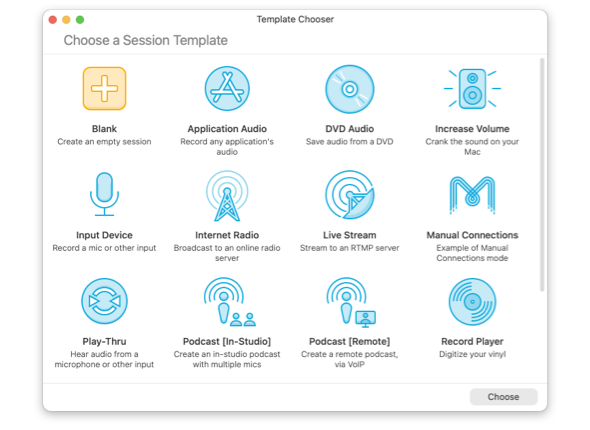
The templates provided make it a snap to accomplish common audio capture tasks. When we select the Web Audio template by double-clicking it, Audio Hijack will create a new session for us.
Configuring the Audio Grid
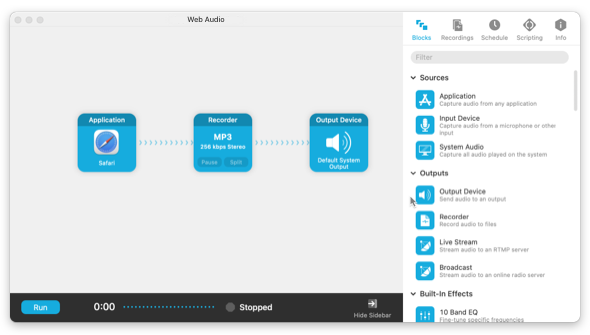
An Audio Hijack Session
The Web Audio template will create a session like the one seen above, with three blocks in the audio grid. On the left, the Safari web browser has been selected as the source. Audio will flow from Safari into a Recorder block, where it will be saved to an MP3 file. The audio will then flow on to the computer's speakers, so it can be heard while it's playing.
This default setup will already enable us to record from Safari. Adjusting and extending things further is as simple as adding new blocks from the Blocks tab, in the sidebar.
Activating the Session
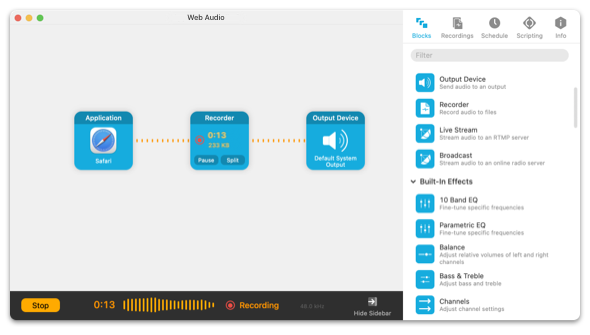
An Audio Hijack session, running
Once the session is configured as desired, we hit the Run button in the lower left. This starts audio flowing through Audio Hijack, and thanks to the blocks we've configured, it's both recorded to an MP3 file and heard via the system's default output. When we're done, we click the Stop button to end audio flow. Now we can check our recording.
Finding the Recording
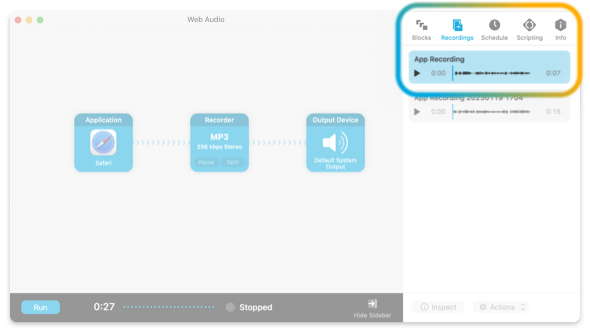
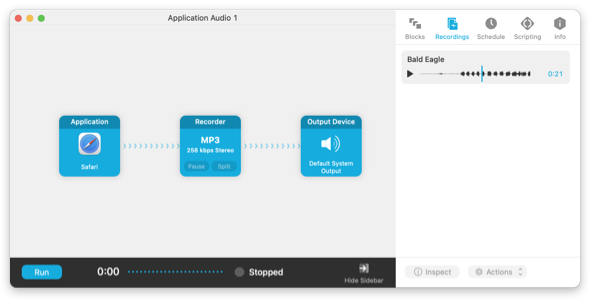
The Recordings tab
Click the Recordings tab in the sidebar on the right side of the session window to see a list of recordings made with this session. We can give the recording a listen, pass it to an audio editor, reveal the actual file in the Finder, and more.
We've now successfully used a session to record with Audio Hijack. Continue reading this manual to learn much more.
Session Basics
Everything in Audio Hijack begins with a session, a reusable collection of settings used to capture and manipulate audio however you like. Sessions are the fundamental document of Audio Hijack, and they're continuously saved as you adjust them. Once a session is configured to your needs, you'll run it to record, broadcast, or adjust audio.
The Session List window provides a list of all your saved sessions for re-use.
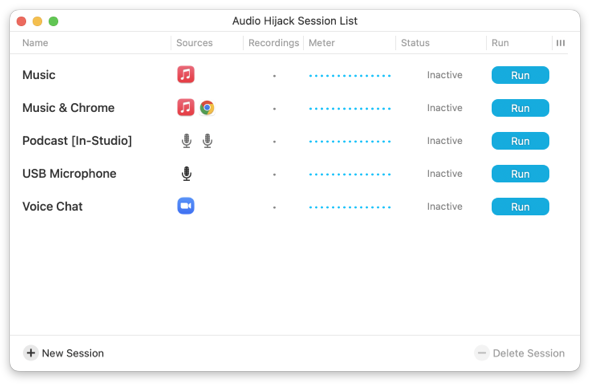
The Session List window
To open any existing session, double-click its name in the list. To create a new session, click the New Session button. To delete a session you no longer need, click once to highlight it, then click the - button in the window's lower right corner.
In addition to creating and loading sessions, the Session List window also functions as a dashboard, with in-line session controls and information. Once a session is configured, you can start and stop it right from here, and monitor its status as well.
Creating a New Session
When you click the New Session button, the Template Chooser will open.
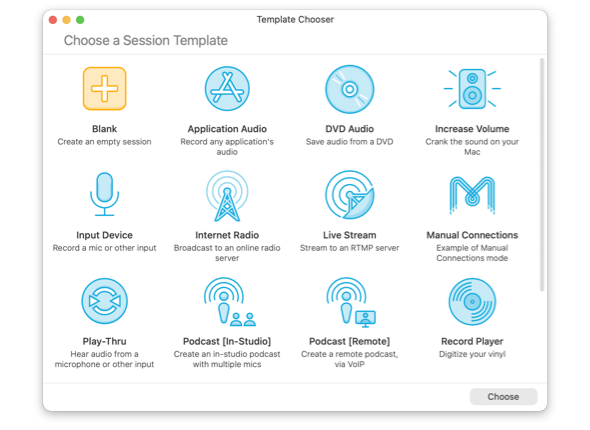
The Template Chooser
The Template Chooser provides templates for common uses of Audio Hijack. Choose the type of capture you'd like to perform, then tweak the resulting session to get it just right. Alternately, to start from scratch, select the Blank template to create an empty session.
The Global Window
With Audio Hijack's global window, you can control sessions even when Audio Hijack is in the background. Access the global window in the upper right of the MacOS menu bar.

Audio Hijack's global icon, in the MacOS menu bar
Clicking the icon will open the window, revealing a list of your sessions.
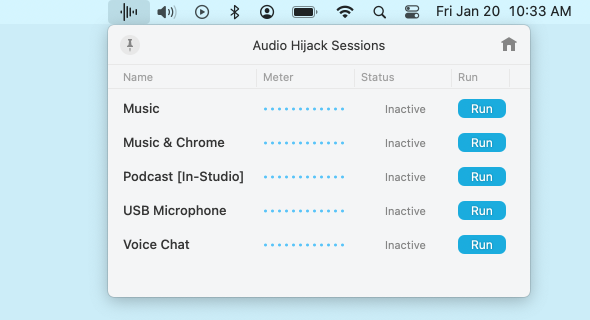
The global window
From here, you can start or stop a session, as well as view its current status. You can also open a specific session by double-clicking it.
Making the Global Window Float
The global window can be accessed system-wide by clicking its icon in the menu bar. For even faster access, it's also possible to make the full window visible at all times, with the Pin button.
![]()
The Pin button on the global window
When you click the Pin button in the upper-left of the global window, the menu will detach and transform into a floating window.
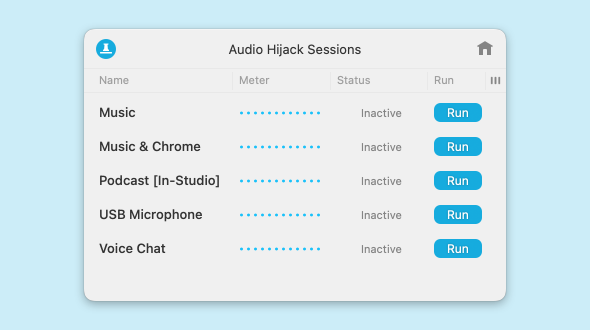
The global window, floating
This will float above all other windows on your system, providing instant access and control over your sessions. Click the Pin button again to return the global window to the menu bar.
Disabling the Global Window
The global window is turned on by default, but it is optional. To remove it from the menu bar, toggle it off in the Settings window.
Customizing the Session List
It’s possible to customize the Session List to display exactly the information you desire.
Adjusting, Re-Ordering, and Resizing Visible Columns
The Session List offers eight possible columns of information. To toggle columns on or off, click the ![]() view options button in the upper-right corner of the table.
view options button in the upper-right corner of the table.
You can re-order the columns by clicking the header of a specific column, then dragging it to the left or right.
The width of each column can be adjusted, using the resize control at the right edge of the column.
Sorting
By default, the Session List sorts sessions alphabetically based on the Name column. Click to toggle the sort between A - Z and Z - A. If you wish, you can sort by other relevant columns instead. Sorting is also available for the Auto Run, Recordings, Status, and Timers columns.
Customize the Global Window As Well
The information shown in the global window is similarly customizable. Start by detaching the window via the Pin button in the upper-left. Once the global window is floating, you’ll be able to adjust visible columns, change the order of columns, and adjust column widths.
Adjusting the width of a column will cause the window’s width to shrink or grow. You can also change the height of the global window by clicking and dragging on its bottom edge.
Mastering Sessions
On this page, we'll take an in-depth look at configuring your Audio Hijack sessions.
Understanding the Audio Grid
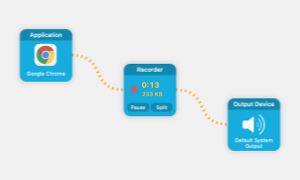 The audio grid is the heart of each session. Within a session, you'll chain together blocks in the audio grid, creating a pipeline for audio to flow through.
To set up a session, add two or more blocks from the block library in the sidebar to the audio grid. By default, connections will be made automatically between nearby blocks. You can always experiment to get the exact audio pipeline you're after, and if you need to, just select Undo to revert undesired changes.
When a session is activated by clicking the Run button, audio from the sources selected will flow through the blocks in the audio grid (from left to right by default). The audio is shown in orange as it flows through the audio pipeline. Each block in the chain will adjust, output, or record the audio according to its settings.
The Block Library
The available blocks for use in the audio grid can be found in the block library, located in the sidebar of each session. Every session will need at least one Source block, which will bring audio in, as well as one Output block, to record audio, broadcast it, or pass it along to your speakers.
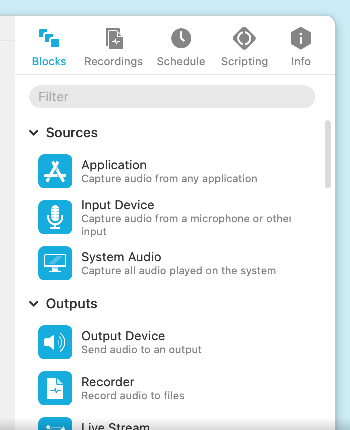
Sessions can also use audio effect blocks to change and improve audio. Audio Hijack includes a powerful collection of Built-In Effects, along with support for both the Audio Unit Effects provided by MacOS and those available from third parties. Meter blocks provide visual meters so you can see how audio is flowing. Finally, Advanced blocks provide additional ways to manipulate audio, discussed in depth on the Advanced Blocks page.
The library provides a quick overview of all blocks. Once a block is placed in the audio grid, its distinct configuration options can be adjusted using block controls.
Laying Out Blocks
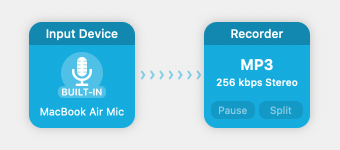
The sequence of blocks you lay out will determine what audio is affected by Audio Hijack, and how it's affected. Block layouts can be very simple, like this layout where audio from the computer's built-in microphone is being recorded.
Layouts can also be more complex, and more powerful. Below, audio from two different inputs is being adjusted with different audio effects. Each input is then recorded separately, before a third recording combining the two is made. This layout will result in three different audio files.
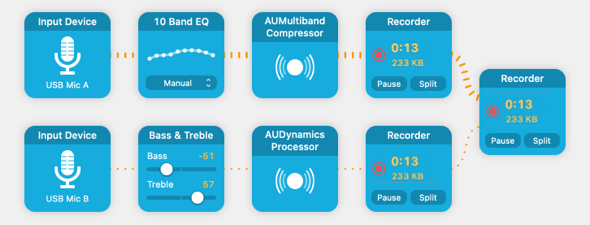
Blocks can be laid out in nearly limitless ways to create the exact audio pipeline you desire.
Block Controls
Once you've laid out your blocks, you may also wish to tweak their individual settings. A few blocks offer controls right on their face.
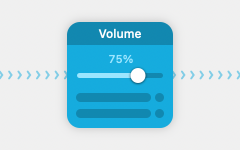
The Volume block, with on-face controls
Controls are always available in each block's popover. Click a block to see its popover.
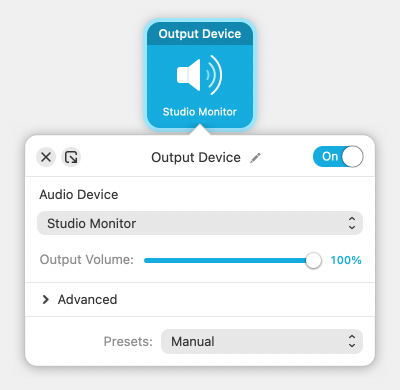
The Output block's popover
Each popover contains custom settings and controls for that particular block. These are largely straight-forward, though some audio effects have more complex settings. Remember that you can always experiment to get the sound you're after.
Advanced: Manual Connections
By default, Audio Hijack handles the logic of connecting blocks to create the session's audio pipeline. This is recommended for most users, but if you wish to tweak things yourself, you can. To begin, turn off the Automatic Connections switch in the session's Info tab.
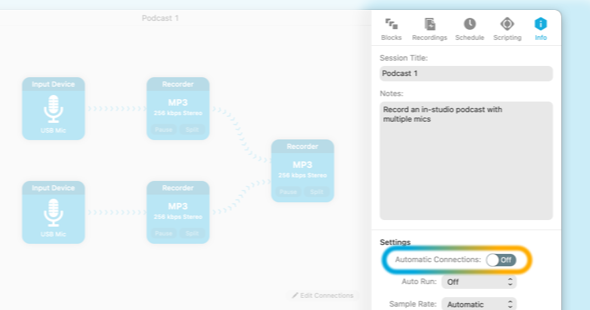
When Automatic Connections are turned off, you must manually connect one block to another to create the audio pipeline. This is done in the session's edit mode, which can be entered by clicking the Edit Connections button in the lower right of the audio grid.
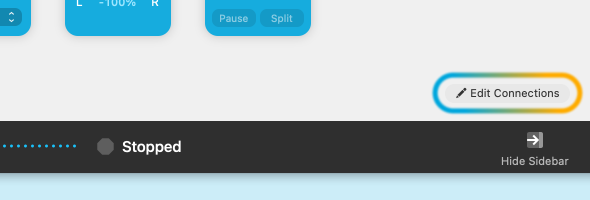
Once in edit mode, you have full control over the pipeline. To connect two blocks, click and drag from the (+) on the right side of the first block to the ( ) receiving port on the left side of the second block, as shown below:
To delete a connection, click the pipeline segment, then select Delete from the Edit menu, or press Command-Delete on the keyboard.
When you've finished configuring your pipeline, exit the edit mode by clicking Stop Editing.
Exporting and Importing Sessions
After you've precisely configured a session, you may find it useful to share it with others. Whether you have a podcasting partner or just someone you're trying to assist, Audio Hijack makes this easy with its shareable sessions.
To export a session, have it open in the foreground or click to highlight it in the Session List window, then select Export Session from the Session menu. Choose a location, and Audio Hijack will save your session out as a .ah4session file. Once you have your .ah4session file, you can email it to a friend, publish it on your website, or share it however you like. When another Audio Hijack user opens the file, the session will be automatically imported. It's a great way to show off your custom setup.
Importing a session is a snap too. As long as you have Audio Hijack installed, you can just double-click the .ah4session file in the Finder. Audio Hijack will launch and import the session instantly. You can also select Import Session from the Sessions menu in Audio Hijack. Either way, the new session will appear right in your Session List window, ready for inspection and use.
Sidebar Controls
Session Sidebar

The sidebar found in each Audio Hijack session window consists of five tabs: Blocks, Recordings, Schedule, Scripting, and Info. On this page, we'll review each of those tabs.
Blocks
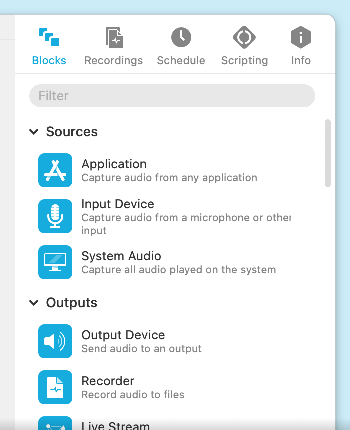
The Blocks tab contains Audio Hijack's block library, which provides all available blocks for use in the audio grid. Blocks are dragged and dropped from here into your session to configure your audio pipeline. The block library is discussed in more depth on the Mastering Sessions page.
Recordings
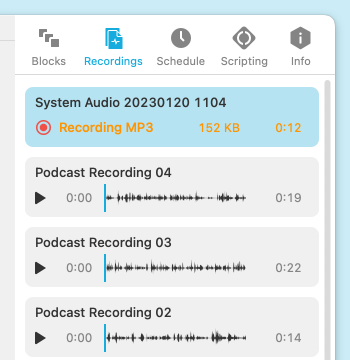
The Recordings tab shows a list of recordings previously created by a particular session, as well as any in-progress recordings. The files themselves will be on your hard drive where you specified, of course, but the Recordings tab provides a quick way to view and act on them.
To preview a recording, click its Play button. You can also click one or more recordings to highlight, then use the Actions menu to reveal the selected file(s) in the Finder, open them in your chosen audio editor, add them to Apple's Music app, or share them via the MacOS Share controls.
In addition, the Remove From List option will remove the item from the Recordings tab (without impacting files in the Finder), while Move to Trash places the file(s) in the Mac's Trash, in preparation for complete deletion.
When a recording is highlighted, you can also click the Inspect button (or just double-click the recording) to bring up the Recording Inspector.
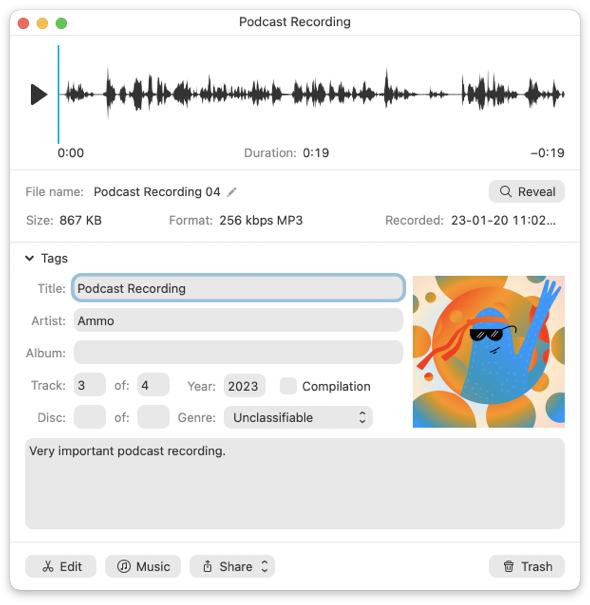
The Recording Inspector
From this window, you can view full details on the recording, edit its metadata tags, and take the aforementioned actions on it as well.
Schedule
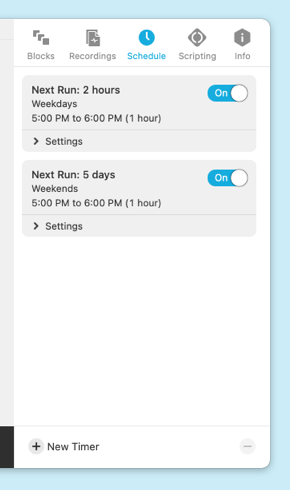
With timers, you can trigger a session to run at a specified time. Timers allow you to to record audio on a schedule or create a musical alarm. Once a timer is configured, just make sure your computer is on and you're logged in. After that, Audio Hijack will run the session at the time you specify, launching itself and your sources if necessary.
To create a timer, click the New Timer button at the bottom of the Schedule tab.
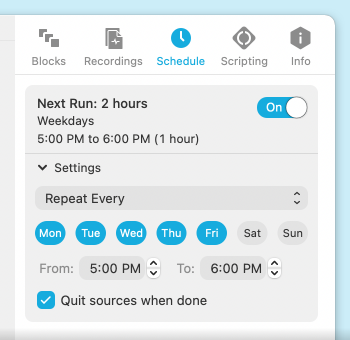
A Timer
At the top of each timer, you'll see the current configuration, as well as an On/Off switch that enables you to disable the timer without needing to delete it.
In the Settings area, you can configure the timer to run on a specific date and time, or to recur on a repeating schedule. The Quit sources when done checkbox does some clean up after a session runs. When active, any application sources used by the session will be quit when the session finishes.
When you add your first timer, the Settings will be installed. This add-on is necessary for robust scheduled operation. It enables timers to wake your Mac and launch Audio Hijack.
To delete a timer, highlight it, then click the - button in the bottom right corner of the window.
Scripting
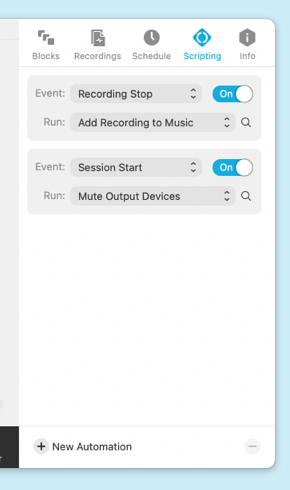
With automations, you can use custom JavaScript to add new behavior to Audio Hijack. This is covered in detail on the Scripting page.
To create an automation, click the New Automation button at the bottom of the window.

An Automation
Use the Event selector to choose when the automation should fire, and the Run selector to pick which script will run.
The On/Off switch enables you to disable the automation without needing to delete it. The magnifying glass provides quick access to the Script Library window, where all your available scripts can be found.
To delete an automation, highlight it, then click the - button in the bottom right corner of the window.
Information
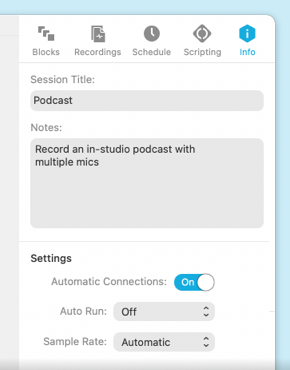
The Info tab contains basic info and settings for the session.
Session Title
This is the name of the session, shown at the top of the window as well as in the lists in the Session List window and global window.
Notes
This text field is provided for you to record any notes about the session. Use it to keep track of minute details, or for any other purpose.
Settings
These session settings adjust how a session behaves and functions.
Automatic Connections
In their default state, sessions automatically handle connecting blocks to create your audio pipeline. This is recommended for most users, but if you wish, you can toggle off the Automatic Connections switch to configure things manually. Learn more about manual connections on the Mastering Sessions page.
Auto Run
Sessions can be configured to run automatically when Audio Hijack is opened, with the On Launch setting. This makes it easy to run sessions non-stop, with minimal intervention required.
If you want an Audio Hijack to run as soon as you log in to your Mac, set the session to run On Launch, then add Audio Hijack to the Login Items area of the Users & Groups area of MacOS's System Settings. When you log in to your user account, Audio Hijack will be launched and the session will start running, automatically.
Sample Rate
When set to “Automatic”, Audio Hijack will use the highest sample rate of audio flowing through it, ensuring no loss of audio quality. This is recommended for most setups, but advanced users can force Audio Hijack to process audio at a specific rate, causing all sources included in the session to be re-sampled as needed.
The Recorder Block
Audio Hijack's Recorder block makes it possible to save any audio flowing through the app. Recording audio is one of the most common use cases for Audio Hijack, so most sessions include at least one Recorder block. This page provides helpful hints on using the block.
Recorder Basics
The face of the Recorder block shows basic information, as well as controls for pausing or splitting an active recording.
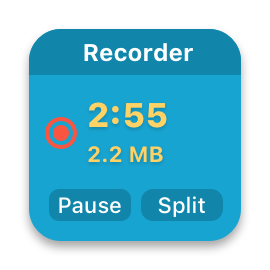
To show all of the block's settings, click the dark blue title area to display its popover.
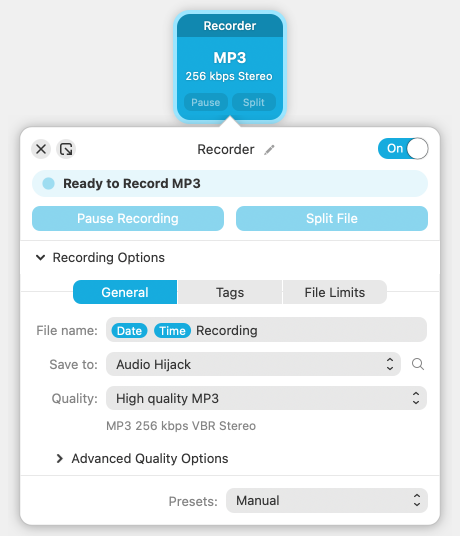
The Recorder block defaults to saving an MP3 file into an Audio Hijack sub-folder your Mac's Music folder. The file is named with the session name, date, and time. These defaults make it easy to begin recording. Just drop a Recorder block into your chain, and you'll be able to record audio without needing to adjust any settings at all.
Of course, these default settings can all be changed as you see fit. With just a few clicks, you can adjust the file name and save location, change the recording format, and add metadata to the recording. For even more customization, read below to learn about the Recorder block's advanced options.
Advanced Options
Custom Recording Format Options
The Quality menu in the General tab of the Recorder block contains six default options for recording. These defaults cover the needs of most users, and most users should stick with them.
More technical users are able to fully customize their recording settings in the Advanced Format Options section. Here, you can specify your preferred file format, as well as more exact recording settings.
File Limits
The File Limits tab provides powerful controls which can automatically affect your recording, without you needing to manually manage an actively running session.
Start new file every
With this control, you can set Audio Hijack to split your recording based on time length or file size. Note that Audio Hijack automatically splits any recording that reaches 2 gigabytes or 24 hours, whichever comes first.
End recording after
This control enables you to stop recording entirely, again based on time or file size. Note that stopping the recording doesn’t stop your session.
Silence controls
Audio Hijack can analyze your audio stream, and take action when it detects silence in the audio. The silence can be removed from the recording (eliminating gaps in the audio), used to trigger the creation of a new file, or used to stop recording entirely.
What constitutes “silence” is set using the Silence Threshold control, based on decibel level. The Digital silence level is a good default for use with app sources, while the Analog level is designed to work with audio device inputs like microphones.
Additional Notes
Pausing & Splitting
While recording, clicking the Pause button on the Recorder block's face or the Pause Recording button in its popover will prevent audio from being added to the currently recording file. The button will then illuminate and switch to saying Resume or Resume Recording. To resume adding audio to the currently recording file, just click again.
Clicking the Split button on the Recorder block's face or the Split File button in its popover will cause Audio Hijack to split your recording. The current file will be ended, and a new file will begin. This is useful for breaking up a recording into multiple files as you record.
Global Recording Control
It can be useful to see a recording's status, and to pause or split it while working elsewhere on your Mac. You can do this by making the Recording popover float, so its controls are always available. To accomplish this, click the Detach button in the upper left of the popover, then click the Pin button to make it float above all other windows.
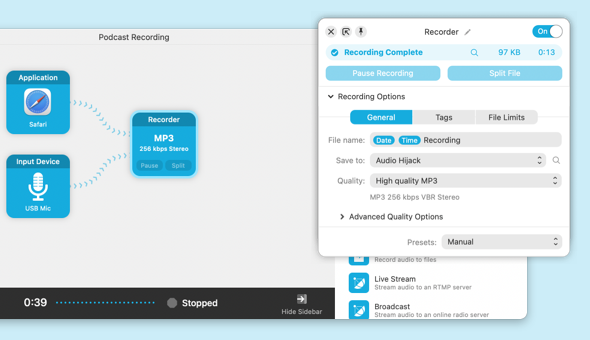
For more details on floating popovers, see the Popover Features page.
Using Multiple Recorder Blocks in a Single Session
Using multiple Recorder blocks in a single session is a great way to get synchronized recordings, all with a single click.
Recording to Multiple Formats
If you wish to record the same audio to multiple formats, you can add multiple Recorder blocks to your session.
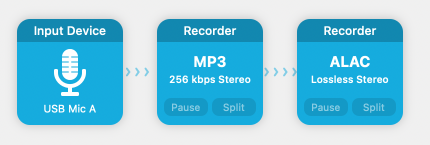
The example session above shows two Recorder blocks with different format settings. The first is recording to lossy MP3, while the second is recording to lossless ALAC.
Recording Different Audio
In the above example, the same audio will be recorded to two different file formats. You may also wish to record different portions of your audio pipeline to different files. This can also be accomplished using multiple Recorder blocks.
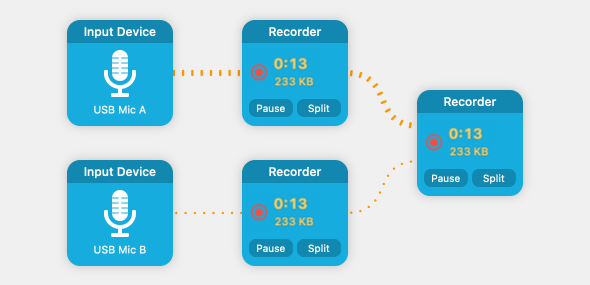
The above images shows a simple in-person podcast setup. Microphone A will be recorded to one file, while Microphone B will be recorded to a second file. Finally, the combined audio from Microphones A and B will be recorded in a third file.
Popover Features
Block popovers provide access to a block's controls, so you can configure their custom settings. These popovers also offer several handy features which are worth knowing about.
The On/Off Switch
First up is the On/Off switch, found in the upper right of each block's popover. Using this switch (or right-clicking a block and selecting Turn Off This Block) enables you to turn off an individual block in your audio chain.

A popover's On/Off switch
With this control, you can test and fine-tune your pipeline, even as audio flows through it. Test audio effects individually, or check your audio inputs without recording until you're ready.
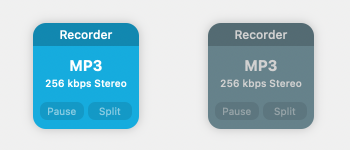
Left: A Recorder block that's on;
Right: A Recorder block that's off
You can see which blocks are currently off by looking at your chain. Those blocks which are grayed out are inactive, and won't affect audio in any way. The audio will simply flow past any inactive blocks, as if they weren't there. Just be sure all desired blocks are on when needed!
Popover Detaching and Pinning
Single-clicking a block's title area will reveal its popover for quick adjustment. When you click a second block, the first block's popover will close, and the second block's popover will open. Generally, this is desirable, but in some cases you may wish to more rapidly adjust a block's settings.
Detaching a Popover
To view and access multiple popovers at once within Audio Hijack, you can detach them from their blocks. Click the Detach button in the upper left of a popover to detach it.
The Detach button
Below, you can see the popover for the 10 Band Equalizer after it has been detached. Its settings will now be accessible in Audio Hijack, even if another block is selected.
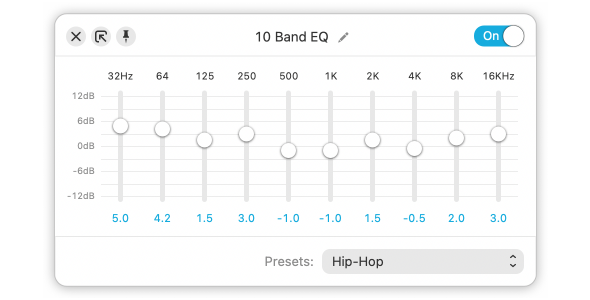
An Equalizer popover, detached
When a popover is detached, the Reattach button takes the place of the Detach in the upper left.
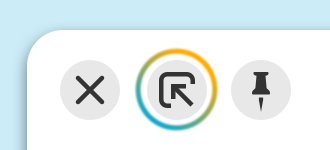
The Reattach button
Clicking the Reattach button will return the popover to the block.
Pinning a Popover
A block's settings can also accessible even when Audio Hijack is in the background, by making the popover float with the Pin button. After a popover is detached, the Pin button will appear in the popover's upper left corner.
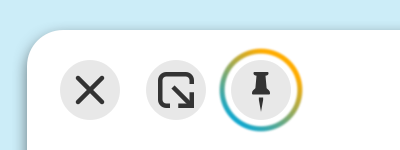
The Pin button
Clicking the Pin button will cause the detached popover to float above all windows on your system, making it accessible from within any application.
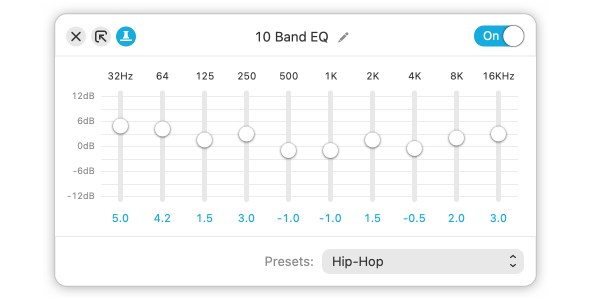
An Equalizer popover, detached and pinned
Clicking the Pin button again will stop it from floating above other applications.
Presets
At the bottom of nearly every popover, you'll see a section called Presets. Presets are a way to save settings for a particular block type, for later use. Presets are saved at the application level, which means they can be used in any other copy of the block in Audio Hijack.
A simple example of presets can be found in the 10 Band Equalizer. It comes with built-in presets for genres like “Rock” or “Jazz”, but you can also save custom presets. Tweak the settings to your liking, then select Save as Preset from the Presets menu. You'll be able to name your preset, and it will always be accessible from the Presets menu.
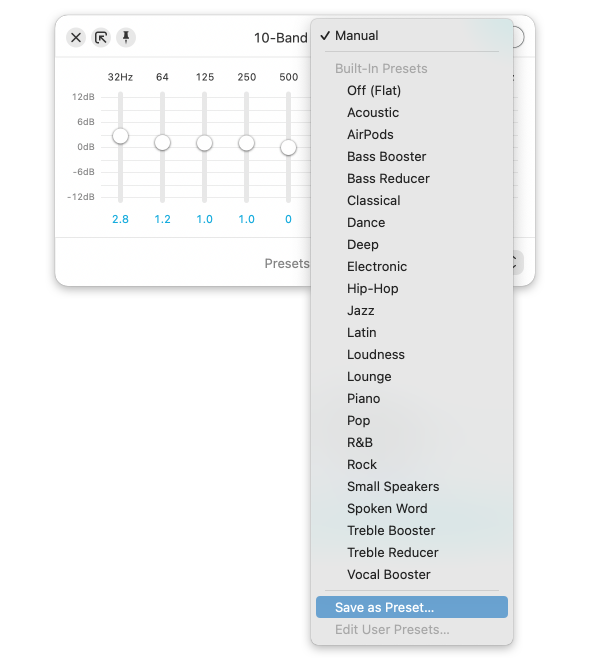
The Presets menu in an Equalizer
Presets aren't limited solely to audio effects like the 10 Band Equalizer. In fact, you can save a preset in almost any block, including the Application input, the Recorder block, and much more. Once you configure presets, they'll save you a tremendous amount of time.
Block Nicknames
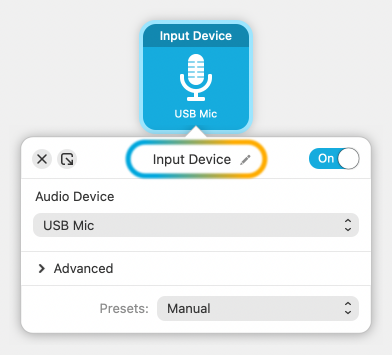
At the top of each popover, you'll see the block's default name. Next to that name is an Edit pencil. When you click this, you'll be able to modify the name of the block.
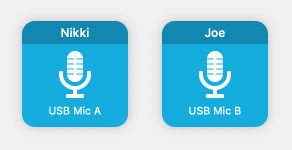
In the image above, two parallel recorders have been given nicknames to help distinguish them from one another. Block nicknames are very useful for keeping track of what each block is doing in your sessions.
Settings
Audio Hijack's settings can be accessed from the Audio Hijack menu. The available options are divided into two tabs.
The General Tab
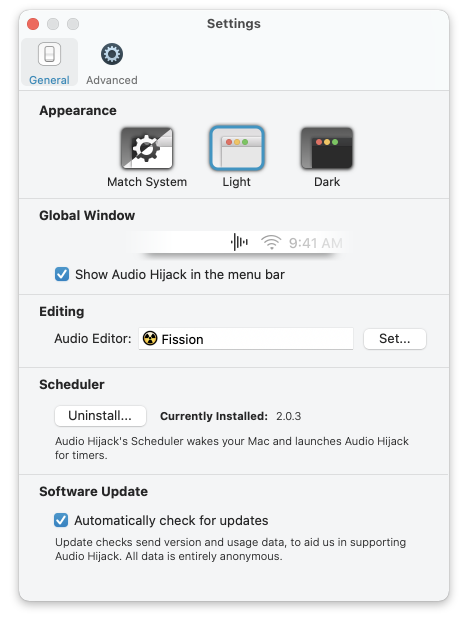
Appearance
Theme Selector: This setting dictates how Audio Hijack will appear, with a choice between a Light theme and a Dark theme.
The default Match System setting follows the OS-wide Appearance setting for Light or Dark Mode. You can alternately force Audio Hijack to use the Light or Dark theme, regardless of your system-wide settings.
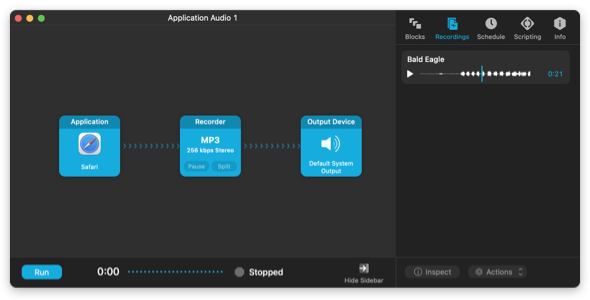
Audio Hijack's Dark theme
Audio Hijack's Light theme
While this manual uses the Light theme throughout, you can easily try either theme. Audio Hijack will update immediately when you adjust this setting.
Global Window
Show Audio Hijack in the menu bar: This checkbox toggles Audio Hijack's global window on or off. When enabled, the icon for the global window will appear in the menu bar whenever Audio Hijack is open, providing access to Audio Hijack's sessions from anywhere on your Mac. Read the Session Basics page for more details.
Editing
Audio Editor: Select your favorite audio editor for use alongside Audio Hijack. Once you set this, click the Actions button in the Recordings tab to send recordings made with Audio Hijack to it with a click.
If you don't have an audio editor, we recommend our own editor Fission. Learn more about it and download a free trial from our site.
Scheduler
Audio Hijack's Scheduler powers timers in Audio Hijack, waking your Mac and launching Audio Hijack to run any timers you set. You'll be prompted to install the Scheduler when you create your first timer.
This setting shows the currently installed version of Scheduler, and allows you to uninstall it if you're no longer using timers.
Software Update
Automatically check for software updates: With this option activated, Audio Hijack periodically compares itself to the most current version available from our server and alerts you when a new version is available. Leave this on and Audio Hijack will help you stay up-to-date. You can also select Check for Update from the Audio Hijack menu to initiate a check manually.
To initiate a check manually, click the Check for Updates… button.
The Advanced Tab
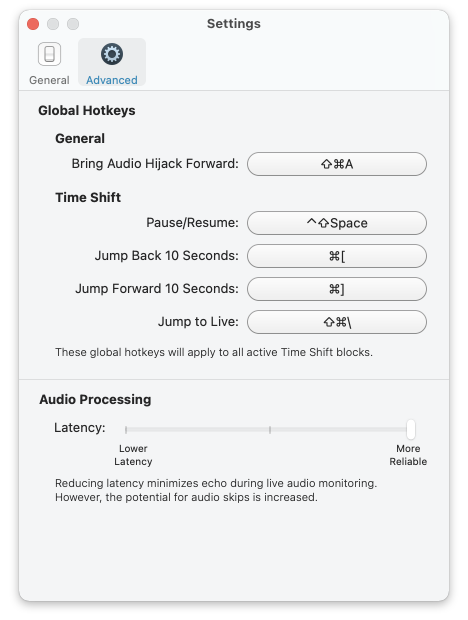
Global Hotkeys
Global hotkeys allow you to use keyboard shortcuts to control Audio Hijack from anywhere on your Mac. You'll want to be sure to set unique shortcuts which aren't used by any other applications.
General
Bring Audio Hijack Forward: With this setting, you can configure a global keyboard shortcut which will immediately bring Audio Hijack to the foreground.
Time Shift
These global shortcuts enable you to access a Time Shift block in the foremost session.
Pause/Resume: This global keyboard shortcut toggles audio play-thru in the Time Shift block, pausing if audio is set to play, and resuming playback if audio is currently paused.
Jump Back: This global keyboard shortcut jumps back in the audio buffer by ten seconds.
Jump Forward: This global keyboard shortcut jumps ahead in the audio buffer by ten seconds.
Jump To Live: This global keyboard shortcut jumps to the present ("Live") point.
Audio Processing
Latency: This slider can be used to reduce latency while monitoring live audio.
The default setting (More Reliable) is recommended for most users. Advanced users can lower latency to reduce or remove any slight echoing that may heard while monitoring audio as it's recorded. However, this may lead to audible skips in audio with complex effects setups and on slower Macs.
Scripting
Allow execution of external scripts: This setting enables the “Run a Script” and “Run Javascript” Shortcuts, as well as support for ".ahcommand" script files. Audio Hijack will prompt you to enable this setting when necessary.
Permissions
Audio Hijack’s Permissions window is shown on first launch, and can also be accessed from the Audio Hijack menu. It lists both required and optional permissions. For the best experience, we recommend enabling all permissions.
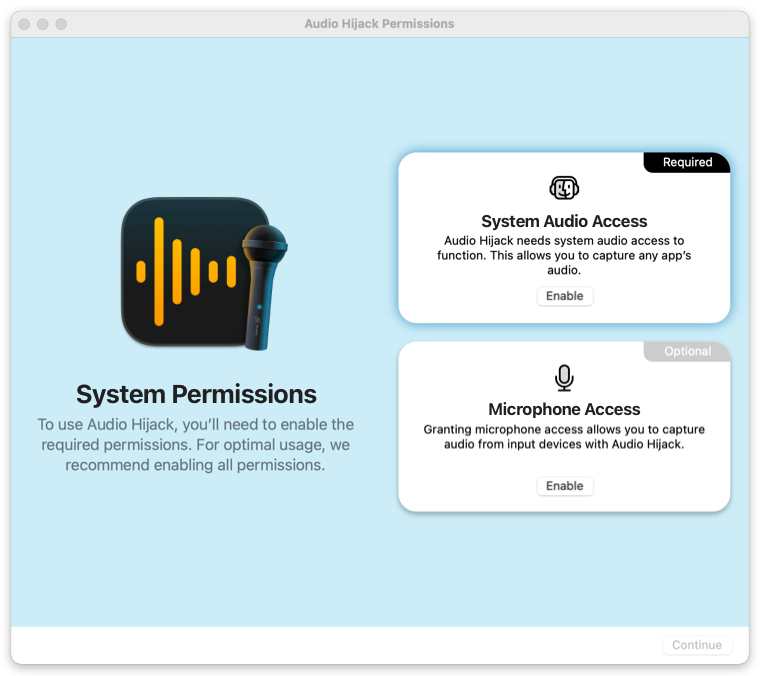
Audio Hijack’s Permissions window
System Audio Access Required
System audio access is required for Audio Hijack to operate, and you’ll be prompted to grant permission the first time you launch the app. This permission enables Audio Hijack to capture audio from other applications running on your Mac.
Microphone Access Optional
To record audio from a microphone or other input device, Audio Hijack must be granted permission with MacOS. If Audio Hijack does not have microphone access when you attempt to record from an input device, it will request it.
Relaunching To Provide Microphone Access
If you’ve previously denied Audio Hijack permission to access your microphone, you’ll see the following dialog when you try to enable the permission, or attempt to capture from an input device.
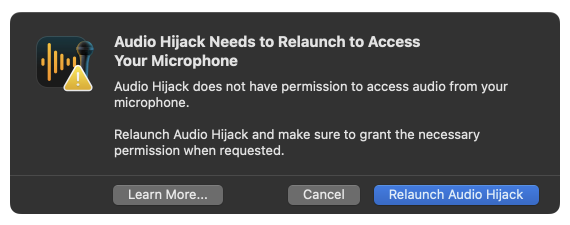
Click Relaunch Audio Hijack, then grant permission when the application relaunches.
Purchasing Audio Hijack
Why should I buy Audio Hijack?
Put simply, you should buy Audio Hijack because it isn't free. We provide a free trial, so you can test out the program and all its features before you buy it. It's like test driving a car, for as long as it takes you to decide.
In trial mode, all of Audio Hijack's features are available to sample, but it won't work for full-time use. During the trial, audio quality is degraded after ten minutes of audio capture per session.
If you use Audio Hijack and find you like it, please purchase a license key - support the software you use and love!
To purchase your license key, just visit https://rogueamoeba.com/store/.
What about upgrades?
If you purchased a license for Audio Hijack 3, you're eligible for a discounted upgrade to version 4.
Read about what's new in Audio Hijack 4 on our site, then purchase a heavily discounted upgrade.
After Purchase
How do I unlock the full version?
The download of Audio Hijack from our site contains both a free trial of the software and the full version. To unlock the full, unlimited version, you just need a valid license key. When you purchase through our store, you'll immediately receive a license key in your browser. It will also be sent to you via email. Simply enter this key into Audio Hijack to unlock it.
What's your upgrade policy?
While we don't have a hard and fast upgrade policy, our philosophy regarding paid upgrades is simple: We try to do what's right for you and what's right for us. We've got a great track record, with many years of very satisfied customers.
For more details on free updates and paid upgrades, read about our upgrade philosophy.
What's your refund policy?
All Rogue Amoeba products are available to try before you buy. We believe that no customer should have to buy software in order to find out how well it works. Our software can be fully evaluated with no limitations in capabilities, prior to purchase. Customers are strongly encouraged to take advantage of these trials prior to purchase. You may also seek any needed technical support from us - we answer support emails rapidly and responsively for current and potential customers alike.
If you would like a refund, please contact our Support Team within 14 days of your purchase. Because we cannot recover the license key that was sold, refunds are issued on a case-by-case basis.
Advanced
Scripting and Automation
An Overview of Scripting
With scripting, it's possible to control Audio Hijack programmatically. Scripts can be connected to respond to certain events or executed via the Shortcuts.app (MacOS 12 and up). While this functionality is primarily targeted at those who can write their own JavaScript, the built-in scripts make basic automation possible for anyone.
On this page, we cover the basics of using scripting and automation in Audio Hijack. If you're ready to write your own scripts, head over to the scripting center in our Knowledge Base.
Session Automations
Scripts can be triggered by events that happen within a session. To do this, you'll configure what we call automations. Automations are created in the Scripting tab of your session. When a specific Event occurs, it will cause the automation to Run the selected script.
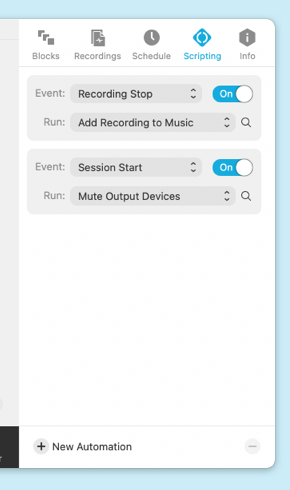
Automations in a session's Scripting tab
Users who are proficient in JavaScript will be able to create scripts that are then triggered with automations, but you don't need any coding ability to take advantage using the built-in scripts. See below for several examples.
Example Automations
Have a look at these simple examples that automate common tasks. You can recreate and adjust them yourself, right in the Scripting tab of any session.
Add a Recording to Music

With the automation shown above, Audio Hijack will add your recordings to Apple's “Music” app automatically.
Reveal a Recording in the Finder

This automation will automatically open the folder where your recording was saved in the Finder.
Quit Audio Hijack When a Timer Finishes

Script Library Window
The creation and management of Audio Hijack scripts is handled in the Script Library window, accessible from the Window menu.
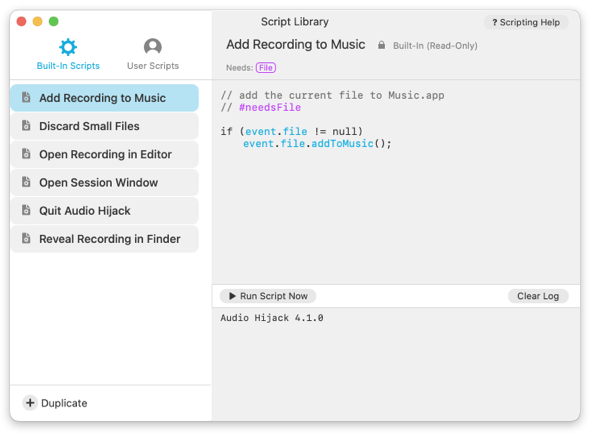
Audio Hijack's Script Library window
This window shows two types of scripts, Built-In Scripts and User Scripts. The Built-In Scripts are bundled with Audio Hijack, and can't be edited. However, you can copy those scripts over to User Scripts with the Duplicate button. User Scripts can be created, edited, and removed at your discretion.
Shortcuts.app Actions
On MacOS 12 (Monterey) and up, Audio Hijack also provides actions for use with the system's Shortcuts app, making it possible to hook Audio Hijack into larger external workflows.
Run/Stop Session: Turn an Audio Hijack session on or off.
Run a Script: Execute an existing script from the Script Library window on a specified session.
Run JavaScript: Execute an arbitrary JavaScript snippet in Audio Hijack. You can also optionally collect the results for further processing.
Note that the latter two Shortcuts will require you to enable the Allow execution of external scripts setting in the Settings window.
Resources for Scripters
If you're familiar with creating scripts, you'll be able to extend Audio Hijack's functionality by writing your own scripts. Audio Hijack's scripting is accomplished via the execution of JavaScript code. The Audio Hijack scripting API allows control of various aspects of sessions, blocks and recordings, and the app provides an integrated editor to create and manage your scripts.
To get started, visit the scripting center in our Knowledge Base.
More to Come
For the initial implementation of scripting in Audio Hijack, we sought to create a solid base upon which we can build in future updates. If there's more you'd like to see, get in touch let us know more.
Transcribe Block
The Transcribe block takes spoken language input and creates a text transcription.1 Transcribe is completely private, with everything happening right on your Mac. Your data is never sent to the cloud, nor shared with anyone else. Read on for information on configuring the Transcribe block, as well as other tips.
Configuring Transcribe
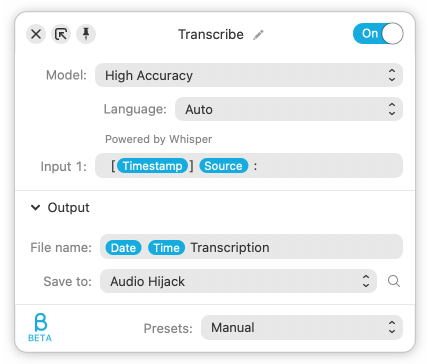
Using the Transcribe block should be fairly straightforward. This section provides details on all of its setup options.
Model

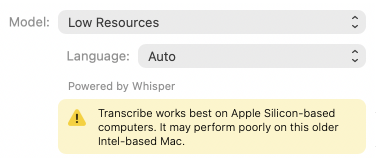
Transcribe offers two different transcription models: Low Resources and High Accuracy.2 You can download and use either or both models. The Low Resources model will download quickly and take up minimal local disk space, while the High Accuracy model will take longer to download and use more disk space.
In practice, the Low Resources model will use less CPU power and produce transcripts quickly, which can be helpful for real-time (or near real-time) use cases. By contrast, the High Accuracy model will use more CPU power and take longer to produce a transcript, but it will provide the most accurate results.
Language
The Language selector can be used to make Transcribe focus its transcription efforts on a specific language, to produce better results. If multiple languages may be spoken, the Auto state can be used. Transcribe will then attempt automatic detection of languages.
Input(s)
Transcribe will show an Input field for each input connected to the block. Each Input can be given a custom name, which will then preface its content in the resulting transcript. Several variables are available for use in this field.
For more details, see “Transcribe From Multiple Inputs” below.
Output
File name
Specify the desired file name for your transcript. Several variables are available for use in this field.
Save to
Specify the location to which Audio Hijack should save your transcript files. By default, Audio Hijack saves to ~/Documents/Audio Hijack.
Transcribe Audio From a Microphone
The most straightforward way to use Transcribe is by providing it with live audio from a microphone connected to your Mac. The block will transcribe this audio, producing a text file containing a transcript.
In Audio Hijack’s Template Chooser, you’ll find a Transcribe template to help you get started transcribing from a microphone. This template takes audio from a microphone and cleans it up, runs it through the Transcribe block, then saves it to an audio file. By default, transcription files are saved into an Audio Hijack sub-folder in your Mac's Documents folder, named with the date and time followed by the word “Transcription”.
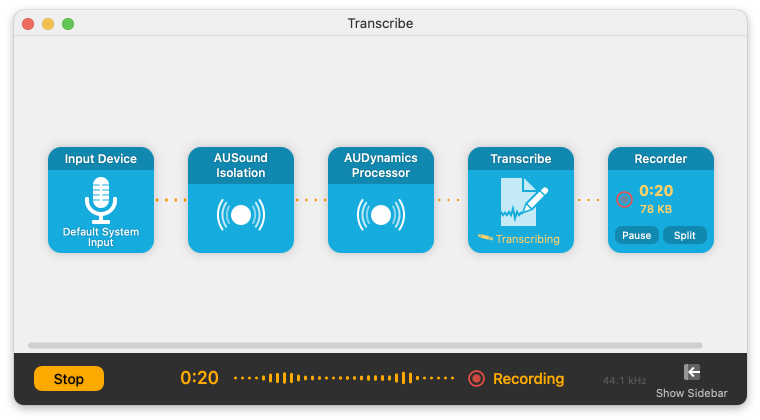
Use the Transcribe template to speak into your Mac and get a transcript back out.
Transcribe Audio From an Application
Audio Hijack can capture audio from any application running on your Mac, and that means you can also transcribe anything you can hear. This is particularly useful for voice and video calls on Zoom, Skype, and other VoIP services.
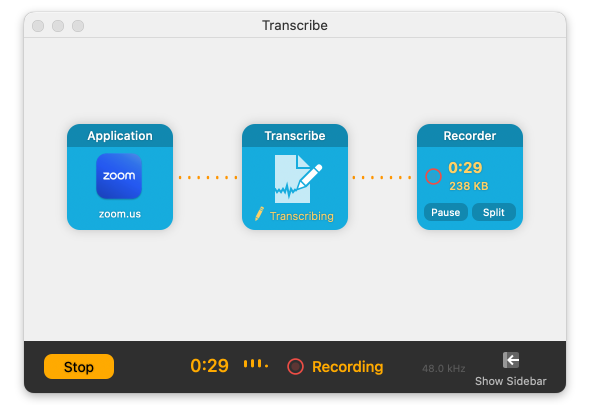
With text transcripts, your meetings on Zoom and calls on FaceTime can now be referenced and searched. Use Transcribe with any application on your Mac, for endless speech to text possibilities.
Transcribe From a File
Transcribe can also assist if you have an existing audio file and want to get a transcript from it. To do this, you’ll play the file in any app (such as MacOS’s QuickTime Player) and capture the audio with Audio Hijack.
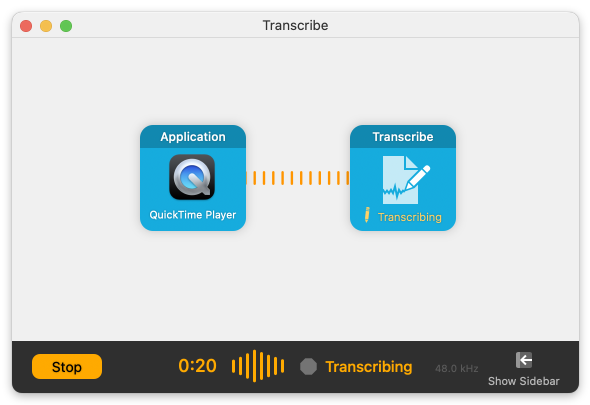
Once the audio is flowing through Audio Hijack, you can route it through the Transcribe block to get a transcript.
Transcribe From Multiple Inputs
Transcribe is especially handy for podcast creators who wish to provide a text transcript for their shows. You can configure your podcast setup so that each speaker is identified, based on input.
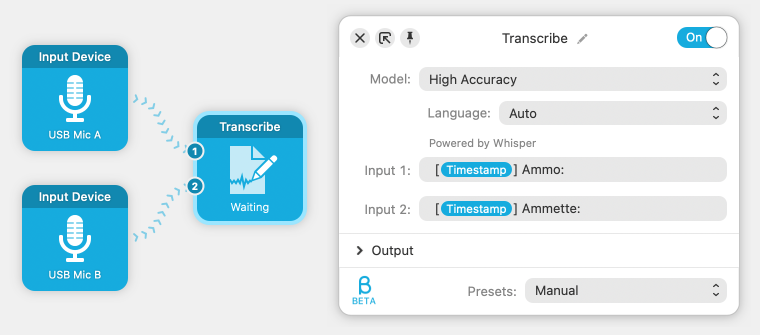
Block Nicknames
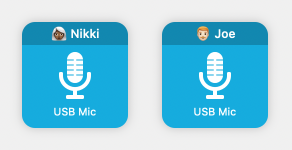
You can also use block nicknames to identify your speakers. Below, the name of each input block has been edited (to “Ammo” and “Ammette”). The Source variable is then used to get the speaker’s name before their text, like so:
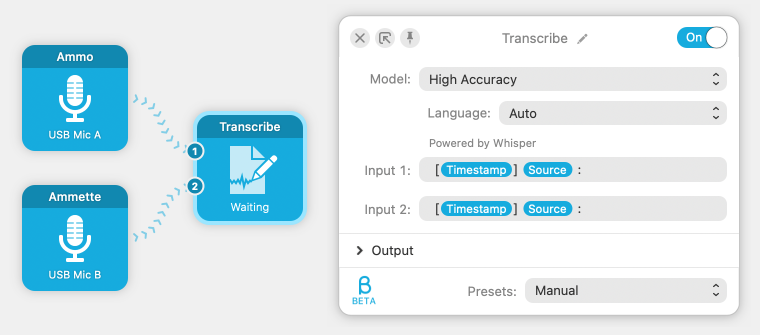
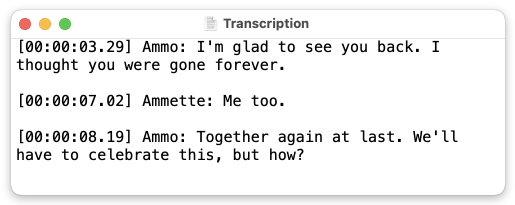
Here, the first input has been given the nickname “Ammo”, while the second has been given the nickname “Ammette”. The resulting file will look like so:
Check Your Transcripts
The Transcribe block is powered by Whisper, OpenAI’s impressive automatic speech recognition system. While the speech recognition is very good, it is not perfect. Be sure to check your transcripts for accuracy.
Footnotes:
In addition to transcribing English, Transcribe can understand and transcribe 98 other languages. See the full list in the Language menu within the Transcribe block. Note that accuracy and quality of transcripts varies by language. ↩︎
At present, “Low Resources” uses the “Base” Whisper model, while “High Accuracy” uses the “Large (v2)” Whisper model. ↩︎
(A) Source Indicator: This line shows the source coming into this slot of the Mixer.
(B) Fade Down to 0%: Clicking this will fade the source down to 0% volume over 0.5 seconds. Shift-clicking will fade down over 2 seconds.
(C) Mute Control: Click this to instantly mute a source entirely. It also shows a general volume level, indicated by the number of waves coming out of the speaker.
(D) Volume Slider: This slider allows you to adjust the level of audio passed along from the source.
(E) Fade Up to 100%: Clicking this will fade the source up to 100% volume over 0.5 seconds. Shift-clicking will fade up over 2 seconds.
(F) Solo Button: When clicked, the Solo button will prevent all other audio tracks from passing through the Mixer block. See below for several tips on Solo.
(G) Balance Slider: This slider adjusts the balance passed along from the source.
(H) Multi-Track Fade Controls: Click to fade all sources down to 0% or up to 100%, over 0.5 seconds. Shift click to fade over 2.0 seconds.
(I) Volume Group Preset Buttons: This buttons will store volume settings for all sources. Once a preset is saved, you can click it to instantly adjust the volumes coming from multiple sources.
(J) Preset Save Menu: Use this menu to save the current volume settings to a specific preset.
- Settings
- Cmd-,
- Hide Audio Hijack
- Cmd-H
- Hide Others
- Opt-Cmd-H
- Quit Audio Hijack
- Cmd-Q
- New Session
- Cmd-N
- Open Session
- Cmd-O
- Show Block Library
- Cmd-1
- Show Recordings
- Cmd-2
- Show Schedule
- Cmd-3
- Show Scripting
- Cmd-4
- Show Information
- Cmd-5
- Hide Sidebar
- Cmd-S
- Edit Connections
- Cmd-E
- Filter Library
- Cmd-F
- Undo
- Cmd-Z
- Redo
- Cmd-Shift-Z
- Cut
- Cmd-X
- Copy
- Cmd-C
- Paste
- Cmd-V
- Duplicate
- Cmd-D
- Delete
- Cmd-Delete
- Select All
- Cmd-A
- Start Session
- Cmd-R
- Turn Output Devices Off
- Cmd-J
- Turn Recordings Off
- Cmd-K
- Pause Recordings
- Cmd-B
- Split Recordings
- Cmd-T
- Close
- Cmd-W
- Minimize
- Cmd-M
- Enter Full Screen
- Fn-F (or Globe-F)
- Session List
- Cmd-0
- Recording Inspector
- Cmd-I
- Script Library
- Cmd-L
-
Redistributions of source code must retain the above copyright notice, this list of conditions and the following disclaimer.
-
Redistributions in binary form must reproduce the above copyright notice, this list of conditions and the following disclaimer in the documentation and/or other materials provided with the distribution.
-
Neither the name of the Xiph.org Foundation nor the names of its contributors may be used to endorse or promote products derived from this software without specific prior written permission.
-
Redistributions of source code must retain the above copyright notice, this list of conditions and the following disclaimer.
-
Redistributions in binary form must reproduce the above copyright notice, this list of conditions and the following disclaimer in the documentation and/or other materials provided with the distribution.
-
All advertising materials mentioning features or use of this software must display the following acknowledgment: "This product includes software developed by the OpenSSL Project for use in the OpenSSL Toolkit. (http://www.openssl.org/)"
-
The names "OpenSSL Toolkit" and "OpenSSL Project" must not be used to endorse or promote products derived from this software without prior written permission. For written permission, please contact openssl-core@openssl.org.
-
Products derived from this software may not be called "OpenSSL" nor may "OpenSSL" appear in their names without prior written permission of the OpenSSL Project.
-
Redistributions of any form whatsoever must retain the following acknowledgment: "This product includes software developed by the OpenSSL Project for use in the OpenSSL Toolkit (http://www.openssl.org/)"
-
Redistributions of source code must retain the copyright notice, this list of conditions and the following disclaimer.
-
Redistributions in binary form must reproduce the above copyright notice, this list of conditions and the following disclaimer in the documentation and/or other materials provided with the distribution.
-
All advertising materials mentioning features or use of this software must display the following acknowledgement:
"This product includes cryptographic software written by Eric Young (eay@cryptsoft.com)"
The word 'cryptographic' can be left out if the rouines from the library being used are not cryptographic related :-).
-
If you include any Windows specific code (or a derivative thereof) from the apps directory (application code) you must include an acknowledgement: "This product includes software written by Tim Hudson (tjh@cryptsoft.com)"
-
Redistributions of source code must retain the above copyright notice, this list of conditions and the following disclaimer.
-
Redistributions in binary form must reproduce the above copyright notice, this list of conditions and the following disclaimer in the documentation and/or other materials provided with the distribution.
-
The above copyright notice and this permission notice shall be included in all copies or substantial portions of the Software.
-
The above copyright notice and this permission notice shall be included in all copies or substantial portions of the Software.
Live Stream Block
With the Live Stream block, you can stream audio from your Mac to RTMP-based services like Facebook Live, Twitch, and YouTube Live. While RTMP is often used to stream video, the Live Stream block is focused on transmitting audio feeds, with supplemental video automatically created for you. Using Live Stream, it's a snap to offer a live feed while recording a podcast, and easy to transmit content like live events, concerts, and DJ sets as well.
This page provides information on configuring the Live Stream block, as well as other tips.
Configuring Your Stream
Let's walk through how to configure your stream, starting from the Setup area at the bottom of the popover and working up to the top status line.
The Setup Section
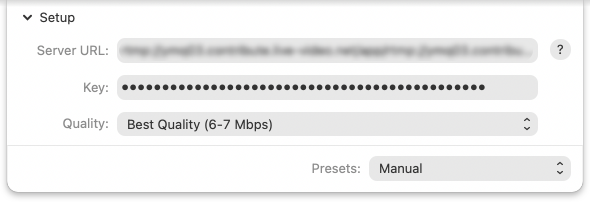
The Setup section is where you'll enter the details for the service to which you'll be streaming. Be sure to enter the Stream URL and Key details correctly to enable the Live Stream block to connect and transmit.
For help connecting to the most popular RTMP-based streaming services, visit the “Notes on Audio Hijack's Live Stream block” article in our Knowledge Base.
In addition to entering server details, you can select your desired encoding quality here. The Live Stream block supports three quality levels, Good, Higher, and Best.
Quality Details
| Quality | Resolution | Frame Rate | Audio |
|---|---|---|---|
| Good | 1024px x 576px | 15 fps | 96 kbps AAC |
| Higher | 1280px x 720px | 30 fps | 128 kbps AAC |
| Best | 1920px x 1080px | 30 fps | 320 kbps AAC |
Note that broadcasting with Live Stream requires significant bandwidth, and higher quality levels use more bandwidth.
Settings will be saved between launches, so once the Setup section is properly configured, you likely won't need to change it.
The Video Layout Section
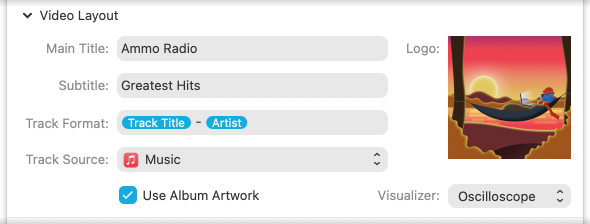
The Video Layout section is used to create the supplementary video feed for your stream. Adjusting the settings here will change what's seen by those who tune in to your stream.
The Main Title and Subtitle text will be overlaid at the top of the video stream.
You can also adjust the track titles which will be shown in the stream. The Track Title field can be customized to adjust which metadata is included. Audio Hijack can automatically pull metadata information from supported Mac applications by setting the Title Source option, or it can pull from a “Now Playing.txt” file. You can even manually enter titles, by editing the Track Title field by hand.
Artwork, either pulled from the Title Source or set as the Logo will automatically be used in the creation of the video stream as well. In addition, you can add a simple Visualizer to the bottom of the video feed.
The Preview Section
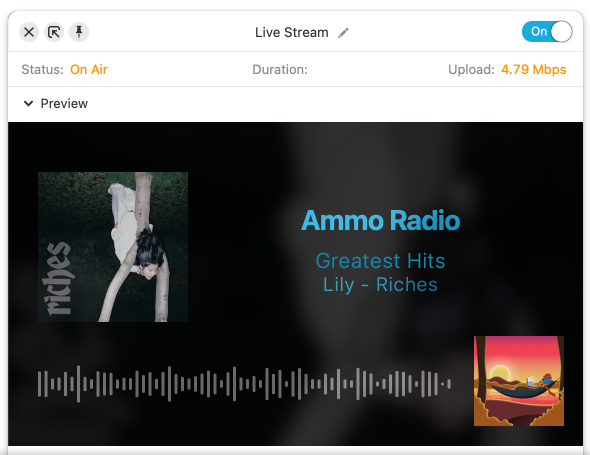
The Preview section shows a large preview of the supplementary video feed. Use it to see how the stream will appear to those who tune in.
The supplementary video is created using the information provided in the Video Layout section. It will show text in the right two-thirds of the frame, with the Main Title text in large font and the Subtitle and Track below in smaller font. Text colors are chosen automatically, and are based on current artwork, if available. Provided artwork is shown in a square on the left third of the frame. If both album artwork and a logo are provided, the logo is placed in a smaller square in the lower right corner. When the Visualizer is on, it appears in the lower third of the frame. Finally, the background incorporates a zoomed-in, blurred, and darkened version of provided artwork.
The Status Line

Finally, at the top of the Live Stream block is the status section. This shows data about the stream itself, as you're transmitting, and resets with each new connection.
Broadcast Block
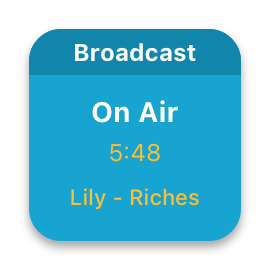
With the Broadcast block, you can stream MP3 or AAC audio from your Mac to an internet streaming server powered by Shoutcast or Icecast. It's perfect for running live feeds of podcasts, as well powering internet radio stations and more.
This page provides information on configuring the Broadcast block, as well as other tips.
Configuring Broadcast
The Setup Tab
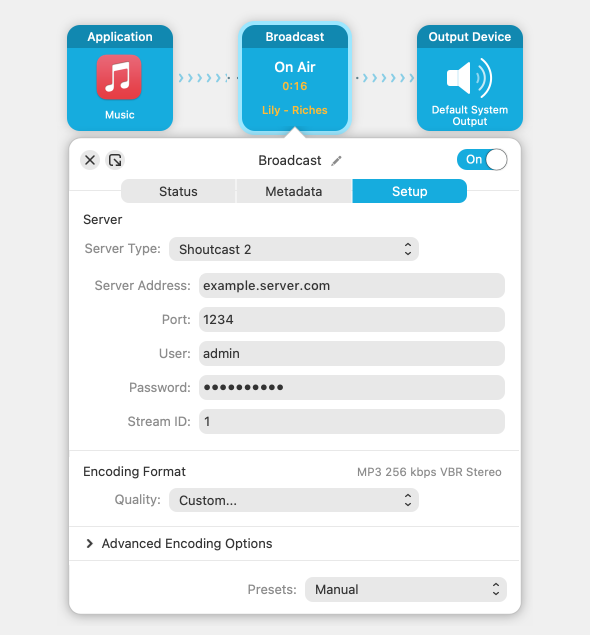
You'll start by entering your server's details, provided by your streaming host provider, into the Setup tab. Be sure to enter all these details correctly to enable the Broadcast block to connect to your server.
For detailed instructions on connecting to several supported hosts, see the “Notes on Audio Hijack's Broadcast block” article in our Knowledge Base.
You'll also select your desired encoding type in the Setup tab. The Broadcast block supports streaming in either the MP3 or AAC formats. When streaming AAC, Broadcast will intelligently switch to AAC-HE (aka AAC+) at 64 kbps and lower. Check with your hosting provider ensure your encoding settings match their requirements.
All of your settings will be saved between launches. Once the Setup tab is properly configured, you likely won't need to change it.
The Metadata Tab
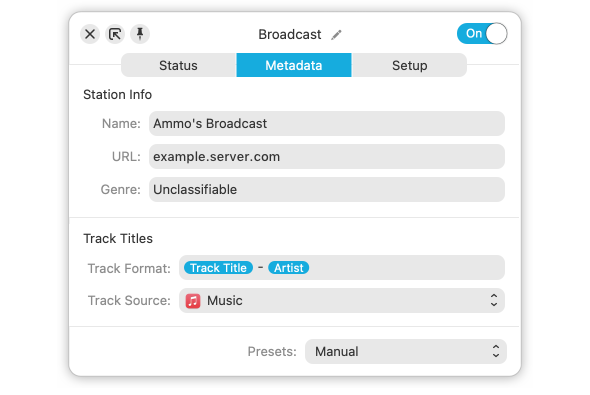
At the top of the Metadata tab, you can set general station information like name and genre, which is likely static.
Below that, you can adjust the track titles which will be embedded in your stream and visible to listeners. Audio Hijack can automatically pull metadata information from supported Mac applications, or from a “Now Playing.txt” file. The Title Format field can be customized to adjust which metadata is shown, and even manually edited for use with sources which don't provide metadata.
Broadcast Tab
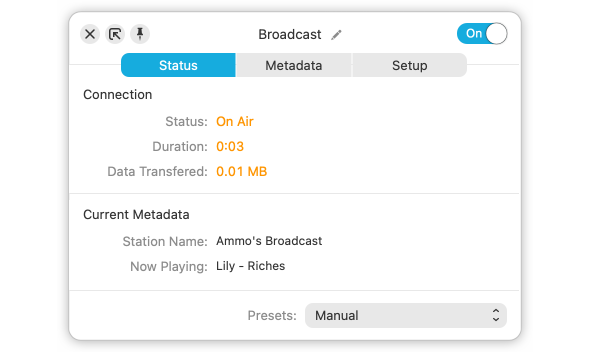
The Status tab shows current statistics, as you're broadcasting. These stats are reset each time you begin a new broadcast.
Advanced Blocks
The Advanced section of Audio Hijack's block library contains several blocks which can help in less common scenarios. A brief overview of each of these blocks is included below.
Declick, Dehum, and Denoise
The Declick, Dehum, and Denoise blocks are each designed to assist in cleaning up audio that is corrupted in various ways, based on settings you provide.

The Declick block can be used to restore audio pulled from vinyl, which often has clicks, pops, and crackles. It can also help remove clicks caused by digital errors. The Threshold slider adjusts the sensitivity of click detection. A lower threshold will repair more clicks, but may result in false positives. A higher threshold will result in fewer repairs, but better avoid false positives.
The Dehum block can remove low frequency hum, which may be a result of a lack of proper electrical grounding in the original recording. The Base Frequency setting should be adjusted to identify the frequency of the hum you wish to remove, while the Dehum Amount setting adjusts how aggressively the block will remove hum. Take note of the two built-in presets, which will help remove two common base frequencies, 50 and 60 Hz.
The Denoise block can be used to remove specific noises found in your audio. Denoise must be trained with an example of the audio you wish to remove, by clicking the Learn Noise button while audio is flowing. Once the block has been taught a noise, it will work to remove it from audio that passes through it. The Noise Reduction setting adjusts how aggressively the block will remove noise, with higher settings removing more noise. The Remaining Noise Floor setting controls how much noise is left in the audio, to avoid unnatural silences and artifacts caused by noise removal.
To obtain the optimal results, you'll likely want to experiment with the settings on each block frequently.
Ducking
The Ducking block causes the volume of a source (or sources) to be lowered automatically when a specified source reaches a pre-defined volume.
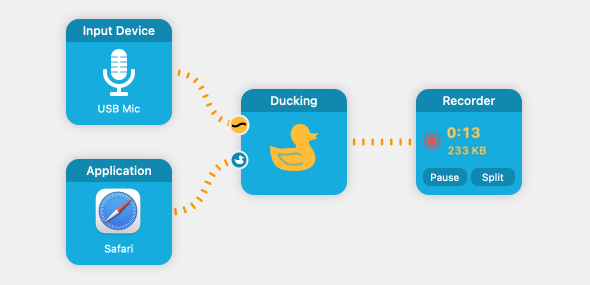
The first source connected to a Ducking block is called the “Overlay” source. Its audio will not be heard at all until it reaches the specified Overlay Threshold. When that occurs, the secondary source (or sources) will be lowered to the Ducked Volume specified.
Among other uses, the Ducking block is particularly helpful for doing voiceovers on top of music.
FIR Filter

The FIR (Finite Impulse Response) Filter block is a powerful tool that uses impulse responses to filter audio. It can be used to emulate specific environments or hardware, by applying a mathematical convolution to your audio with a pre-recorded impulse response file, effectively imprinting the characteristics of the original environment or hardware onto your sound.
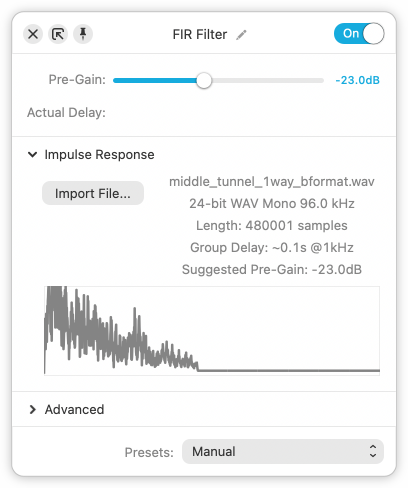
Impulse responses can be captured from real-world spaces or hardware units, allowing you to recreate the acoustics of a cathedral or the sound of a vintage amplifier, for example. This block’s interface allows easy loading of impulse response files, which can be found many places online.
Input Switch
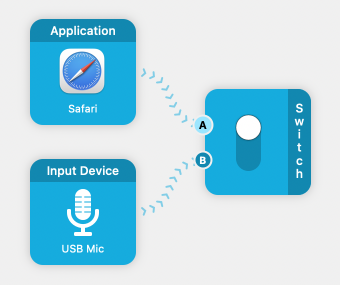
The Input Switch block passes along audio from only one of its two inputs, either A or B. Only the actively selected input will have its audio passed through the chain. This makes it possible to quickly switch what audio is heard farther down the pipeline, great for podcasts, broadcasts, and more.
The inputs to Input Switch can be as simple as two blocks like the Application or Input Device blocks:
Alternately, whole pipelines can feed into the Input Switch:
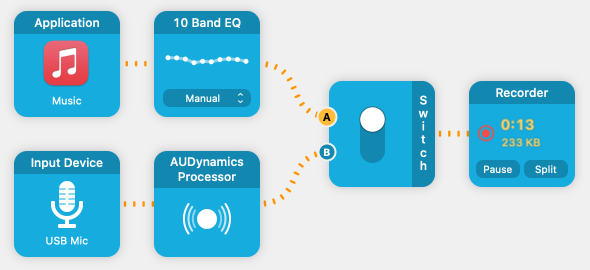
When the switch is clicked, audio will fade from A to B (or vice versa) over 0.5 seconds. If you hold Shift while clicking, a slower 2 second fade will occur.
Mixer
The Mixer block makes it possible to mix up to 5 different sources, all in one place.
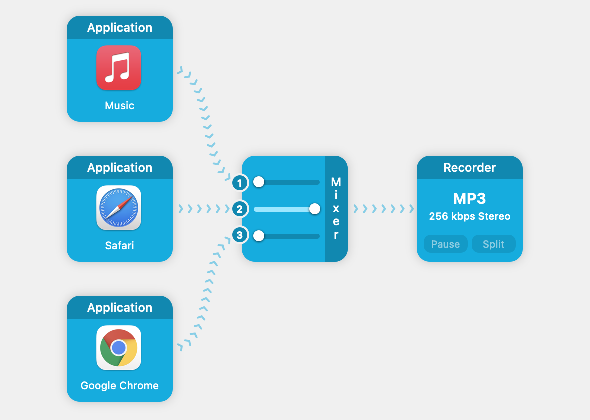
Once sources are connected, several controls can be adjusted rapidly from the Mixer block face, as well as its powerful popover.
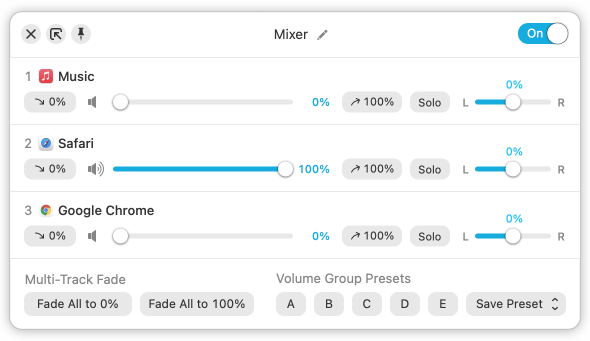
The Mixer popover
The annotated controls in the Mixer popover are as follows:
Mixer Item Controls

Master Controls

Parametric EQ

The Parametric EQ block is designed for precision audio adjustments. It operates across multiple bands, each adjustable in four key parameters:
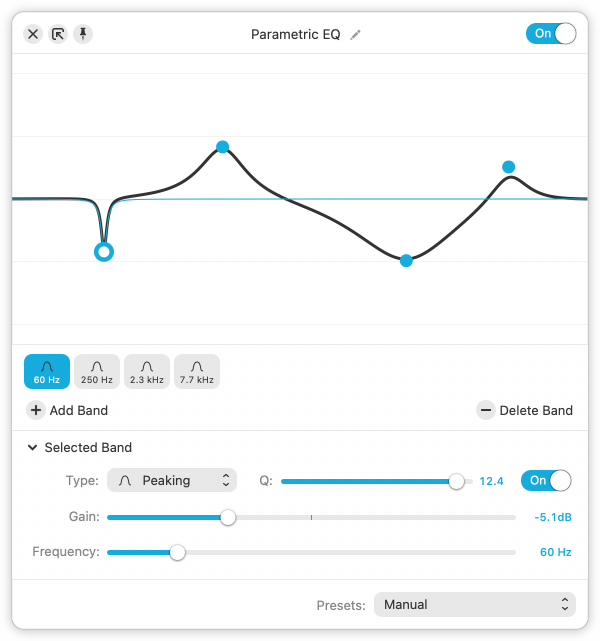
Type: Choose between High Pass, Low Shelf, Peaking, High Shelf and Low Pass filter types.
Frequency: This control determines the center frequency of each EQ band.
Q (bandwidth): Adjust the range of frequencies affected, around the center frequency. A higher Q value affects a narrower range and a lower Q value will affect a broader range.
Gain: Modify the amplitude of the frequencies within the range defined by the Frequency and Q parameters.
These controls offer tremendous power and full customization, so you can experiment to get the exact sound you’re after.
Speech Denoise

The Speech Denoise block utilizes machine learning technology to intelligently identify and suppress background noise, accentuating speech signals. When activated, speech is highlighted by reducing ambient noise, effectively enhancing clarity and overall audio quality.
Sync
The Sync block enables you to add a delay of up to 1000 milliseconds (1 second) as audio passes through the block. This can be useful to sync audio with video.

If a longer delay is needed, you can add multiple sync blocks in series.
Time Shift
The Time Shift block acts like a DVR for your Mac's audio. When you add Time Shift to your chain, it will create a buffer of audio. You can then pause audio, as well as jump backwards. The block face provides simple controls for this, with the popover containing more robust controls.
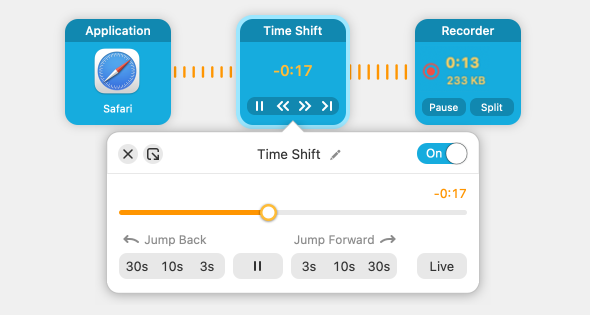
Remember that you can detach a popover and pin it, for access regardless of what app you have in the foreground. See the Popover Features page for more information. You can also set global hotkeys for Time Shift, right in Audio Hijack's Settings.
One of the most common use cases for Time Shift is transcribing audio in near real-time.
Keyboard Controls
Audio Hijack provides robust keyboard navigation, offering controls for sessions along with standard keyboard shortcuts.
Controlling Sessions via Keyboard
Blocks are automatically numbered when added to a session, and the first 10 blocks can be quickly selected using number keys 1 through 9.
To move between blocks in a session, use the Arrow keys. To move a block within the session, hold down the Command key and use the Arrow keys simultaneously. For finer movement, use the Option key instead of the Command key when pressing the Arrow keys.
To adjust settings for a highlighted block, press the Space bar to show and hide the popover. Pressing the Escape key will hide the popover when you’re done.
Default Keyboard Shortcuts
The following keyboard shortcuts are available, based on their commands in the menu bar.
Audio Hijack menu
File menu
Edit menu
Control menu
Window menu
Etcetera
Installing & Uninstalling
Installing Audio Hijack
To install Audio Hijack, drag it from your download folder to the Applications folder, then double-click its icon to begin using it. Audio Hijack will guide you through enabling the permissions needed so you can capture audio.
Uninstalling Audio Hijack
Before removing Audio Hijack, you may wish to uninstall its optional Scheduler tool. You can do this from the Settings window.

Click the Uninstall… button, then enter your Administrator password. The Scheduler will then be removed.
After that, just quit Audio Hijack and place it in the Trash.

If you have any feedback to share, know that we’ll be glad to hear it. Contact us directly to make a feature request, report a problem, or to get assistance. We're always working to improve our products, so please don't hesitate to tell us what was missing or didn't work for you.
User License
Disclaimer
Audio Hijack (“The Software”) is provided as is. Rogue Amoeba Software (“The Author”) is not responsible for any damage to the user's computer system or data and in no event will The Author, its officers, directors, employees or agents be responsible to the user for any consequential, incidental, or indirect damages (including damages for loss of business profits, business interruption, loss of business information, and the like) arising out of the use or inability to use the The Software, even if The Author has been advised of the possibility of such damages. Because some locations do not allow the exclusion or limitation of liability for consequential or incidental damages, the above limitations may not apply to you. Further, the consumer agrees that using this software in any way illegal, or even for the purposes of assessing its viability for illegal usage, is prohibited.
What that said:
Be safe when you use the software. Be aware that it's simply a tool designed to make your life better. Don't use it to do illegal or evil things. If you do, be ready to take responsibility for your own actions.
Distribution
Unless explicitly stated in writing, Rogue Amoeba Software does not grant permission to sell The Software. Non-profit distribution of The Software in its trial form is generally acceptable, provided that The Software is not modified in any way, the complete works of The Software are included in the distribution package, and Rogue Amoeba has been contacted for confirmation.
What that said:
Don't sell this software. If you wish to distribute it in its trial state, get in touch with us to confirm permission.
Acknowledgements
Portions of this Rogue Amoeba software may utilize the following copyrighted material, the use of which is hereby acknowledged.
FFmpeg Project
Copyright © The FFmpeg Project ("FFmpeg")
Parts of this product contain certain software owned by FFmpeg and licensed by Rogue Amoeba. You may obtain a complete machine-readable copy of the source code for FFmpeg under the terms of GNU Library General Public License Version 2.1 ("LGPL"), without charge at https://rogueamoeba.com/opensource/.
The FFmpeg software is distributed in the hope that it will be useful, but WITHOUT ANY WARRANTY; without even the implied warranty of MERCHANTABILITY or FITNESS FOR A PARTICULAR PURPOSE. See the LGPL for more details, available at https://www.gnu.org/licenses/old-licenses/lgpl-2.1.html.
The LAME Project
Copyright © The LAME Project ("Lame")
Parts of this product contain certain software owned by Lame and licensed by Rogue Amoeba. You may obtain a complete machine-readable copy of the source code under the terms of GNU Library General Public License Version 2 ("LGPL"), without charge at https://rogueamoeba.com/opensource/.
The Lame software is distributed in the hope that it will be useful, but WITHOUT ANY WARRANTY; without even the implied warranty of MERCHANTABILITY or FITNESS FOR A PARTICULAR PURPOSE. See the LGPL for more details, available at https://www.gnu.org/licenses/old-licenses/lgpl-2.0.html.
libFLAC
Copyright © Josh Coalson
Copyright © Xiph.Org Foundation
Redistribution and use in source and binary forms, with or without modification, are permitted provided that the following conditions are met:
THIS SOFTWARE IS PROVIDED BY THE COPYRIGHT HOLDERS AND CONTRIBUTORS "AS IS" AND ANY EXPRESS OR IMPLIED WARRANTIES, INCLUDING, BUT NOT LIMITED TO, THE IMPLIED WARRANTIES OF MERCHANTABILITY AND FITNESS FOR A PARTICULAR PURPOSE ARE DISCLAIMED. IN NO EVENT SHALL THE FOUNDATION OR CONTRIBUTORS BE LIABLE FOR ANY DIRECT, INDIRECT, INCIDENTAL, SPECIAL, EXEMPLARY, OR CONSEQUENTIAL DAMAGES (INCLUDING, BUT NOT LIMITED TO, PROCUREMENT OF SUBSTITUTE GOODS OR SERVICES; LOSS OF USE, DATA, OR PROFITS; OR BUSINESS INTERRUPTION) HOWEVER CAUSED AND ON ANY THEORY OF LIABILITY, WHETHER IN CONTRACT, STRICT LIABILITY, OR TORT (INCLUDING NEGLIGENCE OR OTHERWISE) ARISING IN ANY WAY OUT OF THE USE OF THIS SOFTWARE, EVEN IF ADVISED OF THE POSSIBILITY OF SUCH DAMAGE.
The libRTMP Project
Parts of this product contain certain software owned by librtmp and licensed by Rogue Amoeba. You may obtain a complete machine-readable copy of the source code under the terms of GNU Library General Public License Version 2.1 ("LGPL"), without charge at https://rogueamoeba.com/opensource/.
The librtmp software is distributed in the hope that it will be useful, but WITHOUT ANY WARRANTY; without even the implied warranty of MERCHANTABILITY or FITNESS FOR A PARTICULAR PURPOSE. See the LGPL for more details, available at https://www.gnu.org/licenses/old-licenses/lgpl-2.1.html.
The OpenSSL Project
This product includes software developed by the OpenSSL Project for use in the OpenSSL Toolkit (http://www.openssl.org/).
OpenSSL License
Copyright (c) 1998-2019 The OpenSSL Project. All rights reserved.
Redistribution and use in source and binary forms, with or without modification, are permitted provided that the following conditions are met:
THIS SOFTWARE IS PROVIDED BY THE OpenSSL PROJECT "AS IS" AND ANY EXPRESSED OR IMPLIED WARRANTIES, INCLUDING, BUT NOT LIMITED TO, THE IMPLIED WARRANTIES OF MERCHANTABILITY AND FITNESS FOR A PARTICULAR PURPOSE ARE DISCLAIMED. IN NO EVENT SHALL THE OpenSSL PROJECT OR ITS CONTRIBUTORS BE LIABLE FOR ANY DIRECT, INDIRECT, INCIDENTAL, SPECIAL, EXEMPLARY, OR CONSEQUENTIAL DAMAGES (INCLUDING, BUT NOT LIMITED TO, PROCUREMENT OF SUBSTITUTE GOODS OR SERVICES; LOSS OF USE, DATA, OR PROFITS; OR BUSINESS INTERRUPTION) HOWEVER CAUSED AND ON ANY THEORY OF LIABILITY, WHETHER IN CONTRACT, STRICT LIABILITY, OR TORT (INCLUDING NEGLIGENCE OR OTHERWISE) ARISING IN ANY WAY OUT OF THE USE OF THIS SOFTWARE, EVEN IF ADVISED OF THE POSSIBILITY OF SUCH DAMAGE.
This product includes cryptographic software written by Eric Young (eay@cryptsoft.com). This product includes software written by Tim Hudson (tjh@cryptsoft.com).
Original SSL License
Copyright (C) 1995-1998 Eric Young (eay@cryptsoft.com)
All rights reserved.
This package is an SSL implementation written by Eric Young (eay@cryptsoft.com). The implementation was written so as to conform with Netscapes SSL.
This library is free for commercial and non-commercial use as long as the following conditions are aheared to. The following conditions apply to all code found in this distribution, be it the RC4, RSA, lhash, DES, etc., code; not just the SSL code. The SSL documentation included with this distribution is covered by the same copyright terms except that the holder is Tim Hudson (tjh@cryptsoft.com).
Copyright remains Eric Young's, and as such any Copyright notices in the code are not to be removed. If this package is used in a product, Eric Young should be given attribution as the author of the parts of the library used. This can be in the form of a textual message at program startup or in documentation (online or textual) provided with the package.
Redistribution and use in source and binary forms, with or without modification, are permitted provided that the following conditions are met:
THIS SOFTWARE IS PROVIDED BY ERIC YOUNG "AS IS" AND ANY EXPRESS OR IMPLIED WARRANTIES, INCLUDING, BUT NOT LIMITED TO, THE IMPLIED WARRANTIES OF MERCHANTABILITY AND FITNESS FOR A PARTICULAR PURPOSE ARE DISCLAIMED. IN NO EVENT SHALL THE AUTHOR OR CONTRIBUTORS BE LIABLE FOR ANY DIRECT, INDIRECT, INCIDENTAL, SPECIAL, EXEMPLARY, OR CONSEQUENTIAL DAMAGES (INCLUDING, BUT NOT LIMITED TO, PROCUREMENT OF SUBSTITUTE GOODS OR SERVICES; LOSS OF USE, DATA, OR PROFITS; OR BUSINESS INTERRUPTION) HOWEVER CAUSED AND ON ANY THEORY OF LIABILITY, WHETHER IN CONTRACT, STRICT LIABILITY, OR TORT (INCLUDING NEGLIGENCE OR OTHERWISE) ARISING IN ANY WAY OUT OF THE USE OF THIS SOFTWARE, EVEN IF ADVISED OF THE POSSIBILITY OF SUCH DAMAGE.
The licence and distribution terms for any publically available version or derivative of this code cannot be changed. i.e. this code cannot simply be copied and put under another distribution licence [including the GNU Public Licence.]
RNNoise
Copyright © 2018 Gregor Richards
Copyright © 2017 Mozilla
Redistribution and use in source and binary forms, with or without modification, are permitted provided that the following conditions are met:
THIS SOFTWARE IS PROVIDED BY THE COPYRIGHT HOLDERS AND CONTRIBUTORS "AS IS" AND ANY EXPRESS OR IMPLIED WARRANTIES, INCLUDING, BUT NOT LIMITED TO, THE IMPLIED WARRANTIES OF MERCHANTABILITY AND FITNESS FOR A PARTICULAR PURPOSE ARE DISCLAIMED. IN NO EVENT SHALL THE FOUNDATION OR CONTRIBUTORS BE LIABLE FOR ANY DIRECT, INDIRECT, INCIDENTAL, SPECIAL, EXEMPLARY, OR CONSEQUENTIAL DAMAGES (INCLUDING, BUT NOT LIMITED TO, PROCUREMENT OF SUBSTITUTE GOODS OR SERVICES; LOSS OF USE, DATA, OR PROFITS; OR BUSINESS INTERRUPTION) HOWEVER CAUSED AND ON ANY THEORY OF LIABILITY, WHETHER IN CONTRACT, STRICT LIABILITY, OR TORT (INCLUDING NEGLIGENCE OR OTHERWISE) ARISING IN ANY WAY OUT OF THE USE OF THIS SOFTWARE, EVEN IF ADVISED OF THE POSSIBILITY OF SUCH DAMAGE.
Sparkle
Copyright © Andy Matuschak
Permission is hereby granted, free of charge, to any person obtaining a copy of this software and associated documentation files (the "Software"), to deal in the Software without restriction, including without limitation the rights to use, copy, modify, merge, publish, distribute, sublicense, and/or sell copies of the Software, and to permit persons to whom the Software is furnished to do so, subject to the following conditions:
The above copyright notice and this permission notice shall be included in all copies or substantial portions of the Software.
THE SOFTWARE IS PROVIDED "AS IS", WITHOUT WARRANTY OF ANY KIND, EXPRESS OR IMPLIED, INCLUDING BUT NOT LIMITED TO THE WARRANTIES OF MERCHANTABILITY, FITNESS FOR A PARTICULAR PURPOSE AND NONINFRINGEMENT. IN NO EVENT SHALL THE AUTHORS OR COPYRIGHT HOLDERS BE LIABLE FOR ANY CLAIM, DAMAGES OR OTHER LIABILITY, WHETHER IN AN ACTION OF CONTRACT, TORT OR OTHERWISE, ARISING FROM, OUT OF OR IN CONNECTION WITH THE SOFTWARE OR THE USE OR OTHER DEALINGS IN THE SOFTWARE.
Whisper
Copyright © 2022 OpenAI - Link
Permission is hereby granted, free of charge, to any person obtaining a copy of this software and associated documentation files (the "Software"), to deal in the Software without restriction, including without limitation the rights to use, copy, modify, merge, publish, distribute, sublicense, and/or sell copies of the Software, and to permit persons to whom the Software is furnished to do so, subject to the following conditions:
THE SOFTWARE IS PROVIDED "AS IS", WITHOUT WARRANTY OF ANY KIND, EXPRESS OR IMPLIED, INCLUDING BUT NOT LIMITED TO THE WARRANTIES OF MERCHANTABILITY, FITNESS FOR A PARTICULAR PURPOSE AND NONINFRINGEMENT. IN NO EVENT SHALL THE AUTHORS OR COPYRIGHT HOLDERS BE LIABLE FOR ANY CLAIM, DAMAGES OR OTHER LIABILITY, WHETHER IN AN ACTION OF CONTRACT, TORT OR OTHERWISE, ARISING FROM, OUT OF OR IN CONNECTION WITH THE SOFTWARE OR THE USE OR OTHER DEALINGS IN THE SOFTWARE.
Whisper.cpp
Copyright © 2023 Georgi Gerganov - Link
Permission is hereby granted, free of charge, to any person obtaining a copy of this software and associated documentation files (the "Software"), to deal in the Software without restriction, including without limitation the rights to use, copy, modify, merge, publish, distribute, sublicense, and/or sell copies of the Software, and to permit persons to whom the Software is furnished to do so, subject to the following conditions:
THE SOFTWARE IS PROVIDED "AS IS", WITHOUT WARRANTY OF ANY KIND, EXPRESS OR IMPLIED, INCLUDING BUT NOT LIMITED TO THE WARRANTIES OF MERCHANTABILITY, FITNESS FOR A PARTICULAR PURPOSE AND NONINFRINGEMENT. IN NO EVENT SHALL THE AUTHORS OR COPYRIGHT HOLDERS BE LIABLE FOR ANY CLAIM, DAMAGES OR OTHER LIABILITY, WHETHER IN AN ACTION OF CONTRACT, TORT OR OTHERWISE, ARISING FROM, OUT OF OR IN CONNECTION WITH THE SOFTWARE OR THE USE OR OTHER DEALINGS IN THE SOFTWARE.
